一、报错信息:timeout of 60000 exceeded
解决方法:
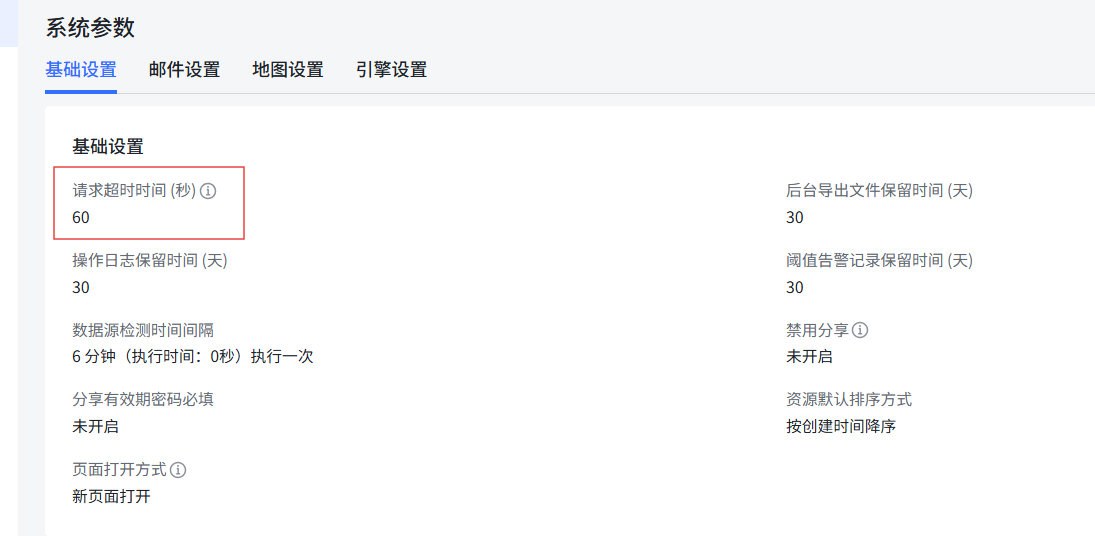
在 DataEase 前端页面参数设置中更改请求超时时间
进入 DataEase 系统后,找到「参数设置」-「基础设置」模块,在编辑模式下调整 “请求超时时间” 参数,当前默认配置如下表:
二、报错信息:Statement cancelled due to timeout or client request
解决方法:
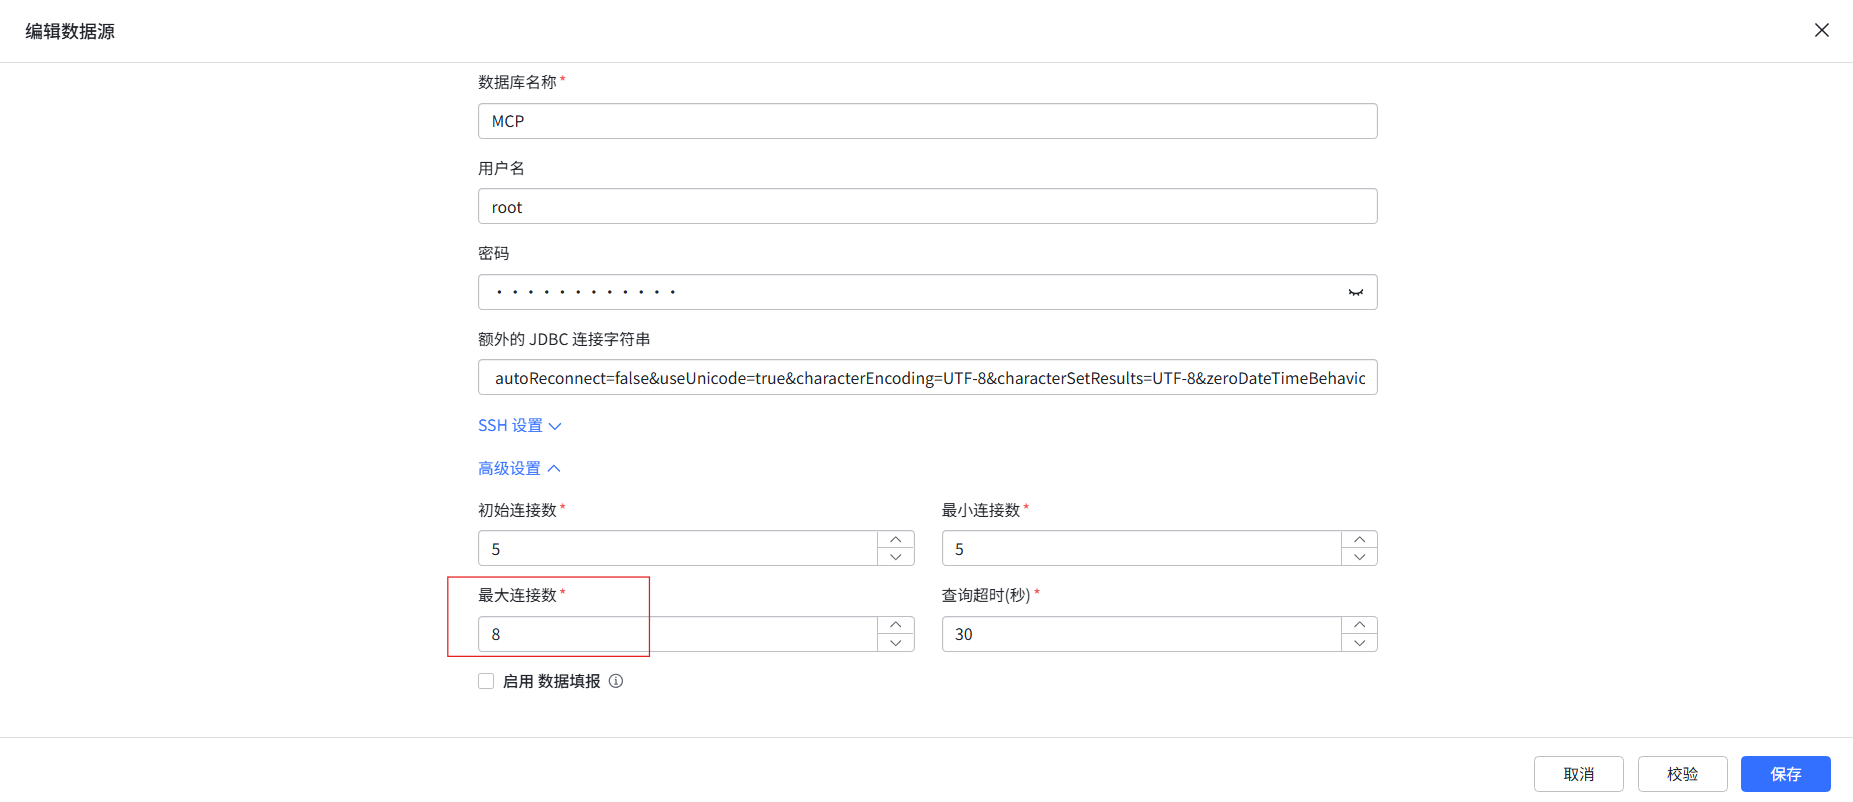
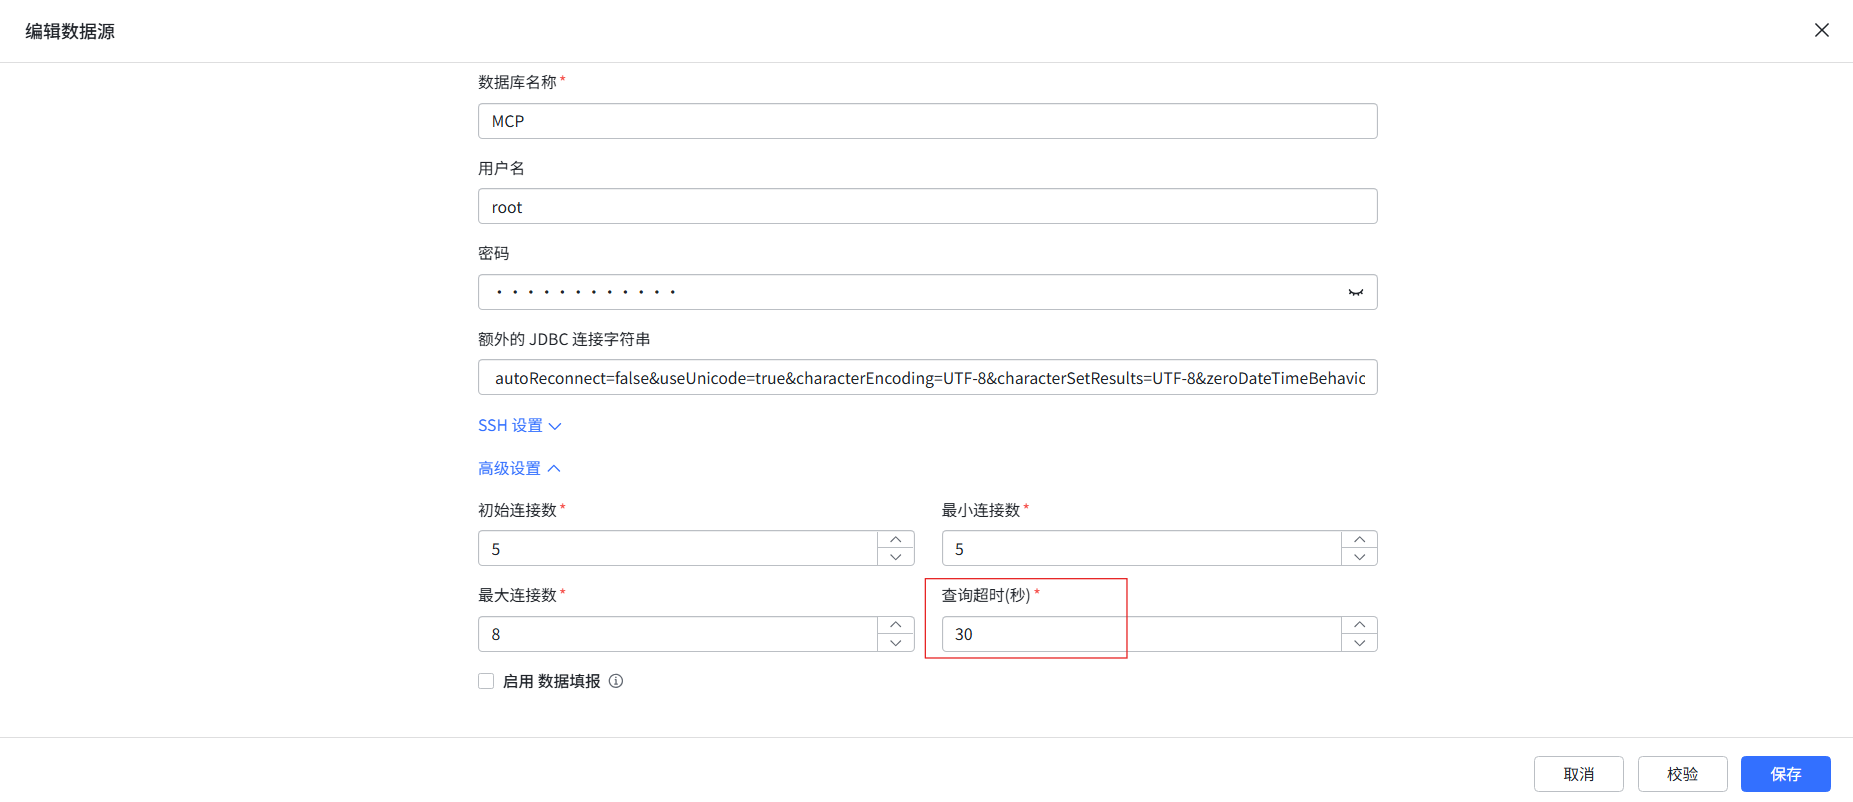
进入具体数据源的「编辑」页面,找到「高级设置」模块,调整 “查询超时” 相关配置。
三、报错信息:Request failed with status code 504
解决方法:
1. APISIX 上游设置中更改超时设置
操作步骤:
在安装目录 /opt/dataease2.0/ 新增配置文件:docker-compose-apisix-dashboard.yml 内容如下:
version: "3"

services:
  apisix-dashboard:
    image: registry.cn-qingdao.aliyuncs.com/dataease/apisix-dashboard:3.0.1-alpine
    container_name: apisix-dashboard
    restart: always
    volumes:
      - ${DE_BASE}/dataease2.0/apisix/dashboard_conf/conf.yaml:/usr/local/apisix-dashboard/conf/conf.yaml
    ports:
      - 9000:9000
    networks:
      dataease-network:
点击展开 ${DE_BASE}/dataease2.0/apisix/dashboard_conf/conf.yaml 文件内容
#
# Licensed to the Apache Software Foundation (ASF) under one or more
# contributor license agreements.  See the NOTICE file distributed with
# this work for additional information regarding copyright ownership.
# The ASF licenses this file to You under the Apache License, Version 2.0
# (the "License"); you may not use this file except in compliance with
# the License.  You may obtain a copy of the License at
#
#     http://www.apache.org/licenses/LICENSE-2.0
#
# Unless required by applicable law or agreed to in writing, software
# distributed under the License is distributed on an "AS IS" BASIS,
# WITHOUT WARRANTIES OR CONDITIONS OF ANY KIND, either express or implied.
# See the License for the specific language governing permissions and
# limitations under the License.
#

conf:
  listen:
    host: 0.0.0.0     # `manager api` listening ip or host name
    port: 9000          # `manager api` listening port
  allow_list:           # If we don't set any IP list, then any IP access is allowed by default.
    - 0.0.0.0/0
  etcd:
    endpoints:          # supports defining multiple etcd host addresses for an etcd cluster
      - "http://apisix-etcd:2379"
                          # yamllint disable rule:comments-indentation
                          # etcd basic auth info
    # username: "root"    # ignore etcd username if not enable etcd auth
    # password: "123456"  # ignore etcd password if not enable etcd auth
    mtls:
      key_file: ""          # Path of your self-signed client side key
      cert_file: ""         # Path of your self-signed client side cert
      ca_file: ""           # Path of your self-signed ca cert, the CA is used to sign callers' certificates
    # prefix: /apisix     # apisix config's prefix in etcd, /apisix by default
  log:
    error_log:
      level: warn       # supports levels, lower to higher: debug, info, warn, error, panic, fatal
      file_path:
        logs/error.log  # supports relative path, absolute path, standard output
                        # such as: logs/error.log, /tmp/logs/error.log, /dev/stdout, /dev/stderr
    access_log:
      file_path:
        logs/access.log  # supports relative path, absolute path, standard output
                         # such as: logs/access.log, /tmp/logs/access.log, /dev/stdout, /dev/stderr
                         # log example: 2020-12-09T16:38:09.039+0800  INFO  filter/logging.go:46  /apisix/admin/routes/r1 {"status": 401, "host": "127.0.0.1:9000", "query": "asdfsafd=adf&a=a", "requestId": "3d50ecb8-758c-46d1-af5b-cd9d1c820156", "latency": 0, "remoteIP": "127.0.0.1", "method": "PUT", "errs": []}
  security:
      # access_control_allow_origin: "http://httpbin.org"
      # access_control_allow_credentials: true          # support using custom cors configuration
      # access_control_allow_headers: "Authorization"
      # access_control-allow_methods: "*"
      # x_frame_options: "deny"
      content_security_policy: "default-src 'self'; script-src 'self' 'unsafe-eval' 'unsafe-inline'; style-src 'self' 'unsafe-inline'; frame-src *"  # You can set frame-src to provide content for your grafana panel.

authentication:
  secret:
    secret              # secret for jwt token generation.
                        # NOTE: Highly recommended to modify this value to protect `manager api`.
                        # if it's default value, when `manager api` start, it will generate a random string to replace it.
  expire_time: 3600     # jwt token expire time, in second
  users:                # yamllint enable rule:comments-indentation
    - username: admin   # username and password for login `manager api`
      password: Password123@apisix

plugins:                          # plugin list (sorted in alphabetical order)
  - api-breaker
  - authz-keycloak
  - basic-auth
  - batch-requests
  - consumer-restriction
  - cors
  - cas-auth
  # - dubbo-proxy
  - echo
  # - error-log-logger
  # - example-plugin
  - fault-injection
  - grpc-transcode
  - hmac-auth
  - http-logger
  - ip-restriction
  - jwt-auth
  - kafka-logger
  - key-auth
  - forward-auth
  - limit-conn
  - limit-count
  - limit-req
  # - log-rotate
  # - node-status
  - openid-connect
  - prometheus
  - proxy-cache
  - proxy-mirror
  - proxy-rewrite
  - redirect
  - referer-restriction
  - request-id
  - request-validation
  - response-rewrite
  - serverless-post-function
  - serverless-pre-function
  # - skywalking
  - sls-logger
  - syslog
  - tcp-logger
  - udp-logger
  - uri-blocker
  - wolf-rbac
  - zipkin
  - server-info
  - traffic-split
启动 APISIX Dashboard 服务:
# 进入安装目录执行
docker-compose -f docker-compose.yml -f docker-compose-mysql.yml -f docker-compose-apisix-dashboard.yml up -d
访问 APISIX Dashboard 登录地址:http://<服务器IP>:9000
默认登录账号:admin,默认密码:Password123@apisix;
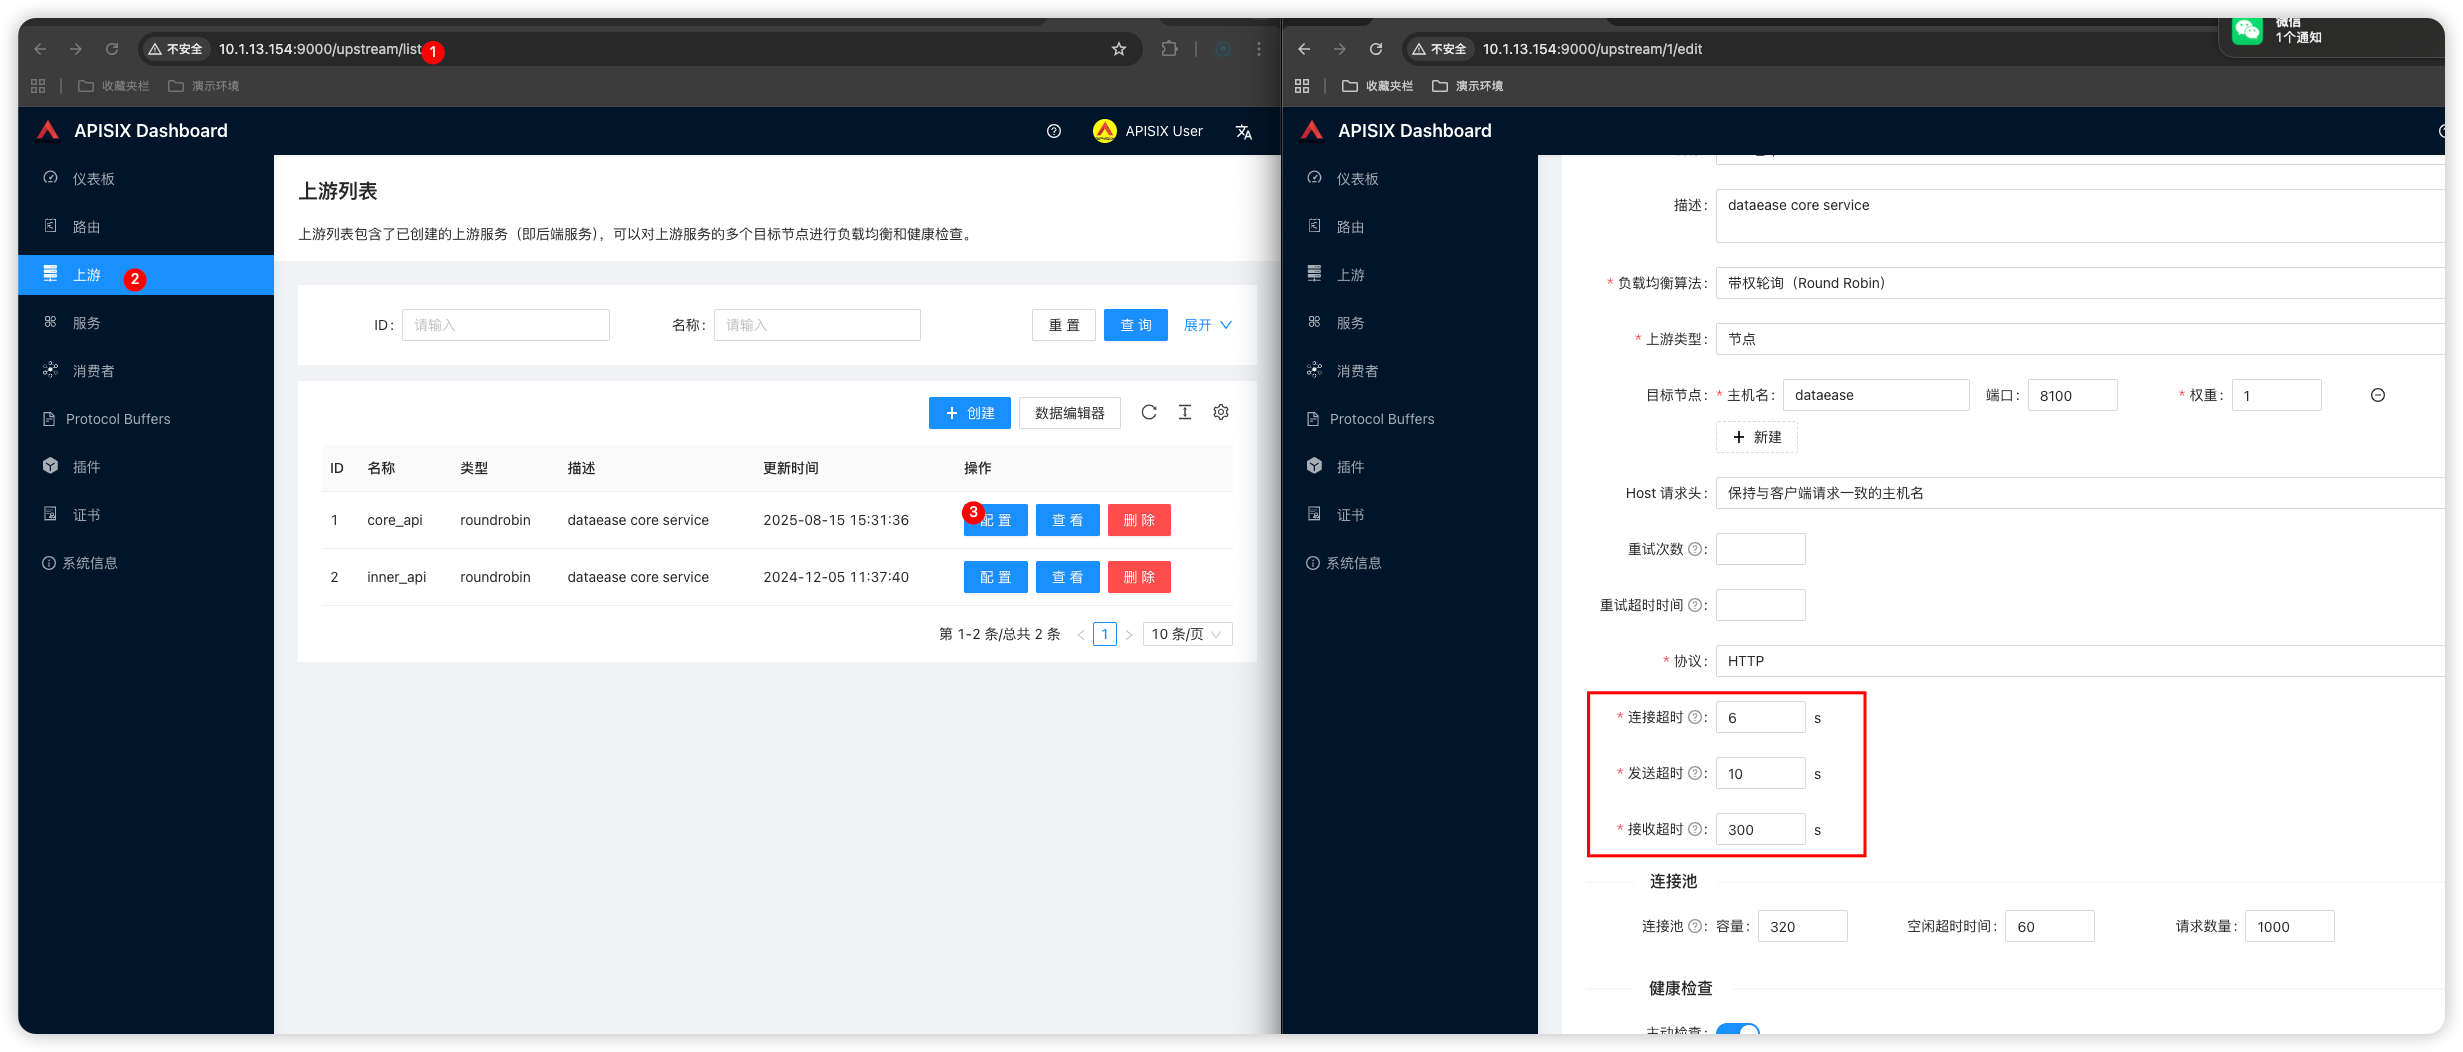
登录后,在左侧导航栏选择「上游」选项,进入上游列表;
找到对应的上游,点击「配置」;
下拉至「超时模块」,调整以下参数(当前参考配置)
❗️注意
apisix-dashboard默认端口和账号密码开放有风险,请在调整配置后删除 apisix-dashboard 容器,命令如下:
docker stop apisix-dashboard
docker rm apisix-dashboard
2. 在 Nginx 中配置超时参数
操作步骤:
进入 Nginx 安装目录,找到conf/nginx.conf配置文件;
在server模块下添加 / 修改以下超时配置(示例代码块):
proxy_connect_timeout 60s
proxy_send_timeout 3600s;
proxy_read_timeout 3600s:
client_body_timeout 3600s;
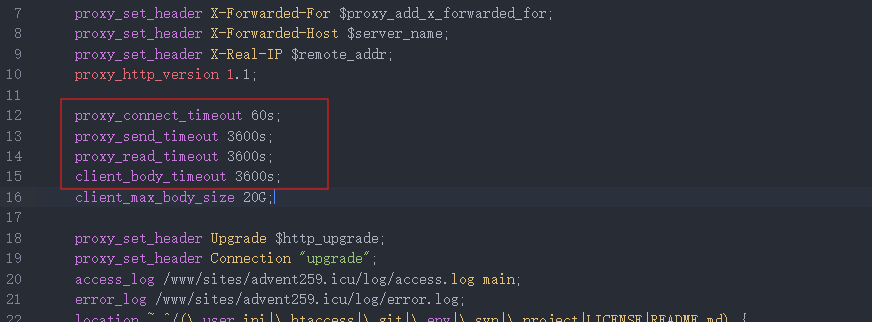
配置完成后,必须重启 Nginx 服务使配置生效。
四、报错信息:Datasource connection exception: 连接无效, Cannot get a connection, pool error Timeout waiting for idle object, borrowMaxWaitDuration=PT5S
解决方法:
进入具体数据源的「编辑」页面,找到「高级设置」模块,调整 “最大连接数” 相关配置