1. 为什么对接 Elasticsearch
JumpServer 堡垒机默认配置把命令存储在数据库的「terminal_command」表,在管理大规模资产数量场景中相应的也会记录更多的命令条目,在这种场景下直接查询数据库获取数据会导致页面有卡顿现象,同时在也不利于归档整理和分类。为了解决上述问题 JumpServer 堡垒机支持将命令存储记录到 Elasticsearch 集群,命令存储在 Elasticsearch 也支持按天创建索引方便整理和归档。
2. JumpServer 堡垒机对接 Elasticsearch 步骤
2.1 环境说明
备注:测试环境中 Elasticsearch 为单机环境。
2.2 Elasticsearch 安装配置
# 安装 java
[root@es-node1 ~]# yum -y install java

# 添加 Elasticsearch 源
[root@es-node1 ~]# rpm --import https://artifacts.elastic.co/GPG-KEY-elasticsearch
[root@es-node1 ~]# cat >> /etc/yum.repos.d/elk.repo << EOF
[elasticsearch]
name=Elasticsearch repository for 7.x packages
baseurl=https://artifacts.elastic.co/packages/7.x/yum
gpgcheck=1
gpgkey=https://artifacts.elastic.co/GPG-KEY-elasticsearch
enabled=0
autorefresh=1
type=rpm-md
EOF

# 安装 Elasticsearch
[root@es-node1 ~]# yum -y install elasticsearch --enablerepo=elasticsearch

# 配置 Elasticsearch
[root@es-node1 ~]# cat >> /etc/elasticsearch/elasticsearch.yml <<EOF
cluster.name: jms-cluster
node.name: es-node01
#path.data: /var/lib/elasticsearch
#path.logs: /var/log/elasticsearch
network.host: 10.1.13.59
http.port: 9200
discovery.seed_hosts: ["10.1.13.59"]
cluster.initial_master_nodes: ["10.1.13.59"]
EOF

[root@es-node1 ~]# grep -Ev "^#|^$" /etc/elasticsearch/elasticsearch.yml
cluster.name: jms-cluster
node.name: es-node01
path.data: /var/lib/elasticsearch
path.logs: /var/log/elasticsearch
network.host: 10.1.13.59
http.port: 9200
discovery.seed_hosts: ["10.1.13.59"]
cluster.initial_master_nodes: ["10.1.13.59"]

# 启动 Elasticsearch 服务
[root@es-node1 ~]# systemctl enable elasticsearch
[root@es-node1 ~]# systemctl start elasticsearch

# 访问 Elasticsearch 服务
[root@ElasticsearchServer ~]# curl http://10.1.13.59:9200
{
  "name" : "es-node01",
  "cluster_name" : "jms-cluster",
  "cluster_uuid" : "OmILsz5oQ1WxDYCfCpISIg",
  "version" : {
    "number" : "7.17.20",
    "build_flavor" : "default",
    "build_type" : "rpm",
    "build_hash" : "b26557f585b7d95c71a5549e571a6bcd2667697d",
    "build_date" : "2024-04-08T08:34:31.070382898Z",
    "build_snapshot" : false,
    "lucene_version" : "8.11.3",
    "minimum_wire_compatibility_version" : "6.8.0",
    "minimum_index_compatibility_version" : "6.0.0-beta1"
  },
  "tagline" : "You Know, for Search"
}
2.3 JumpServer 堡垒机对接 Elasticsearch
2.3.1 JumpServer 堡垒机配置 Elasticsearch 存储信息
在系统设置 -> 存储设置-> 命令存储- 中选择新建 Elasticsearch 存储。
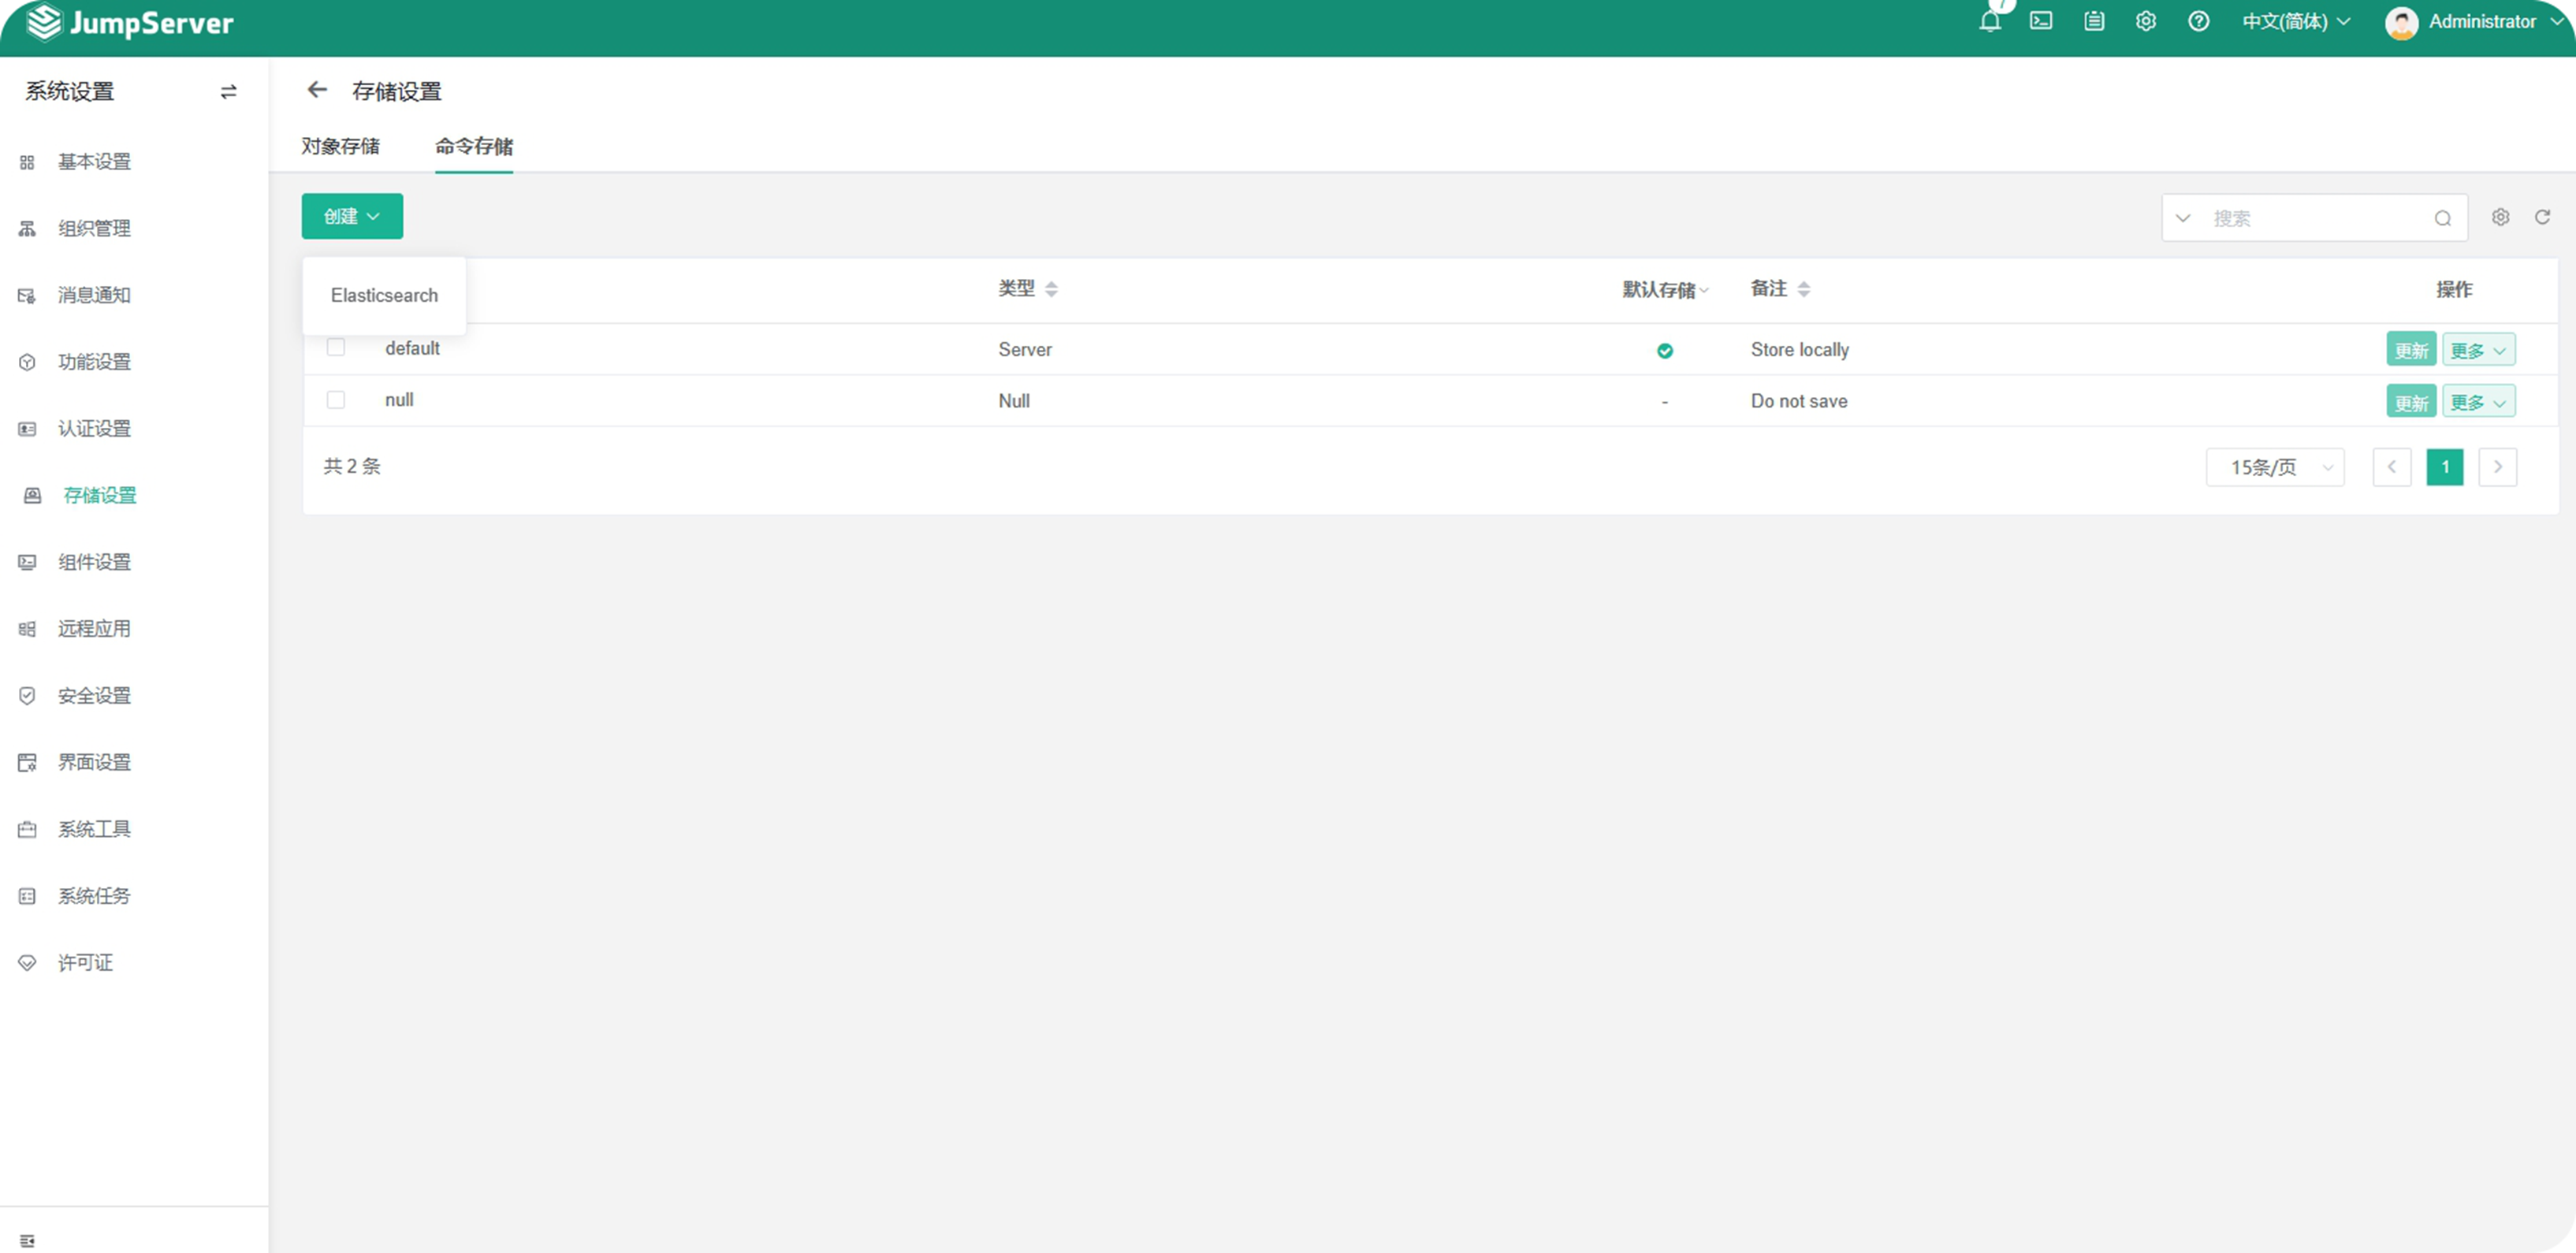
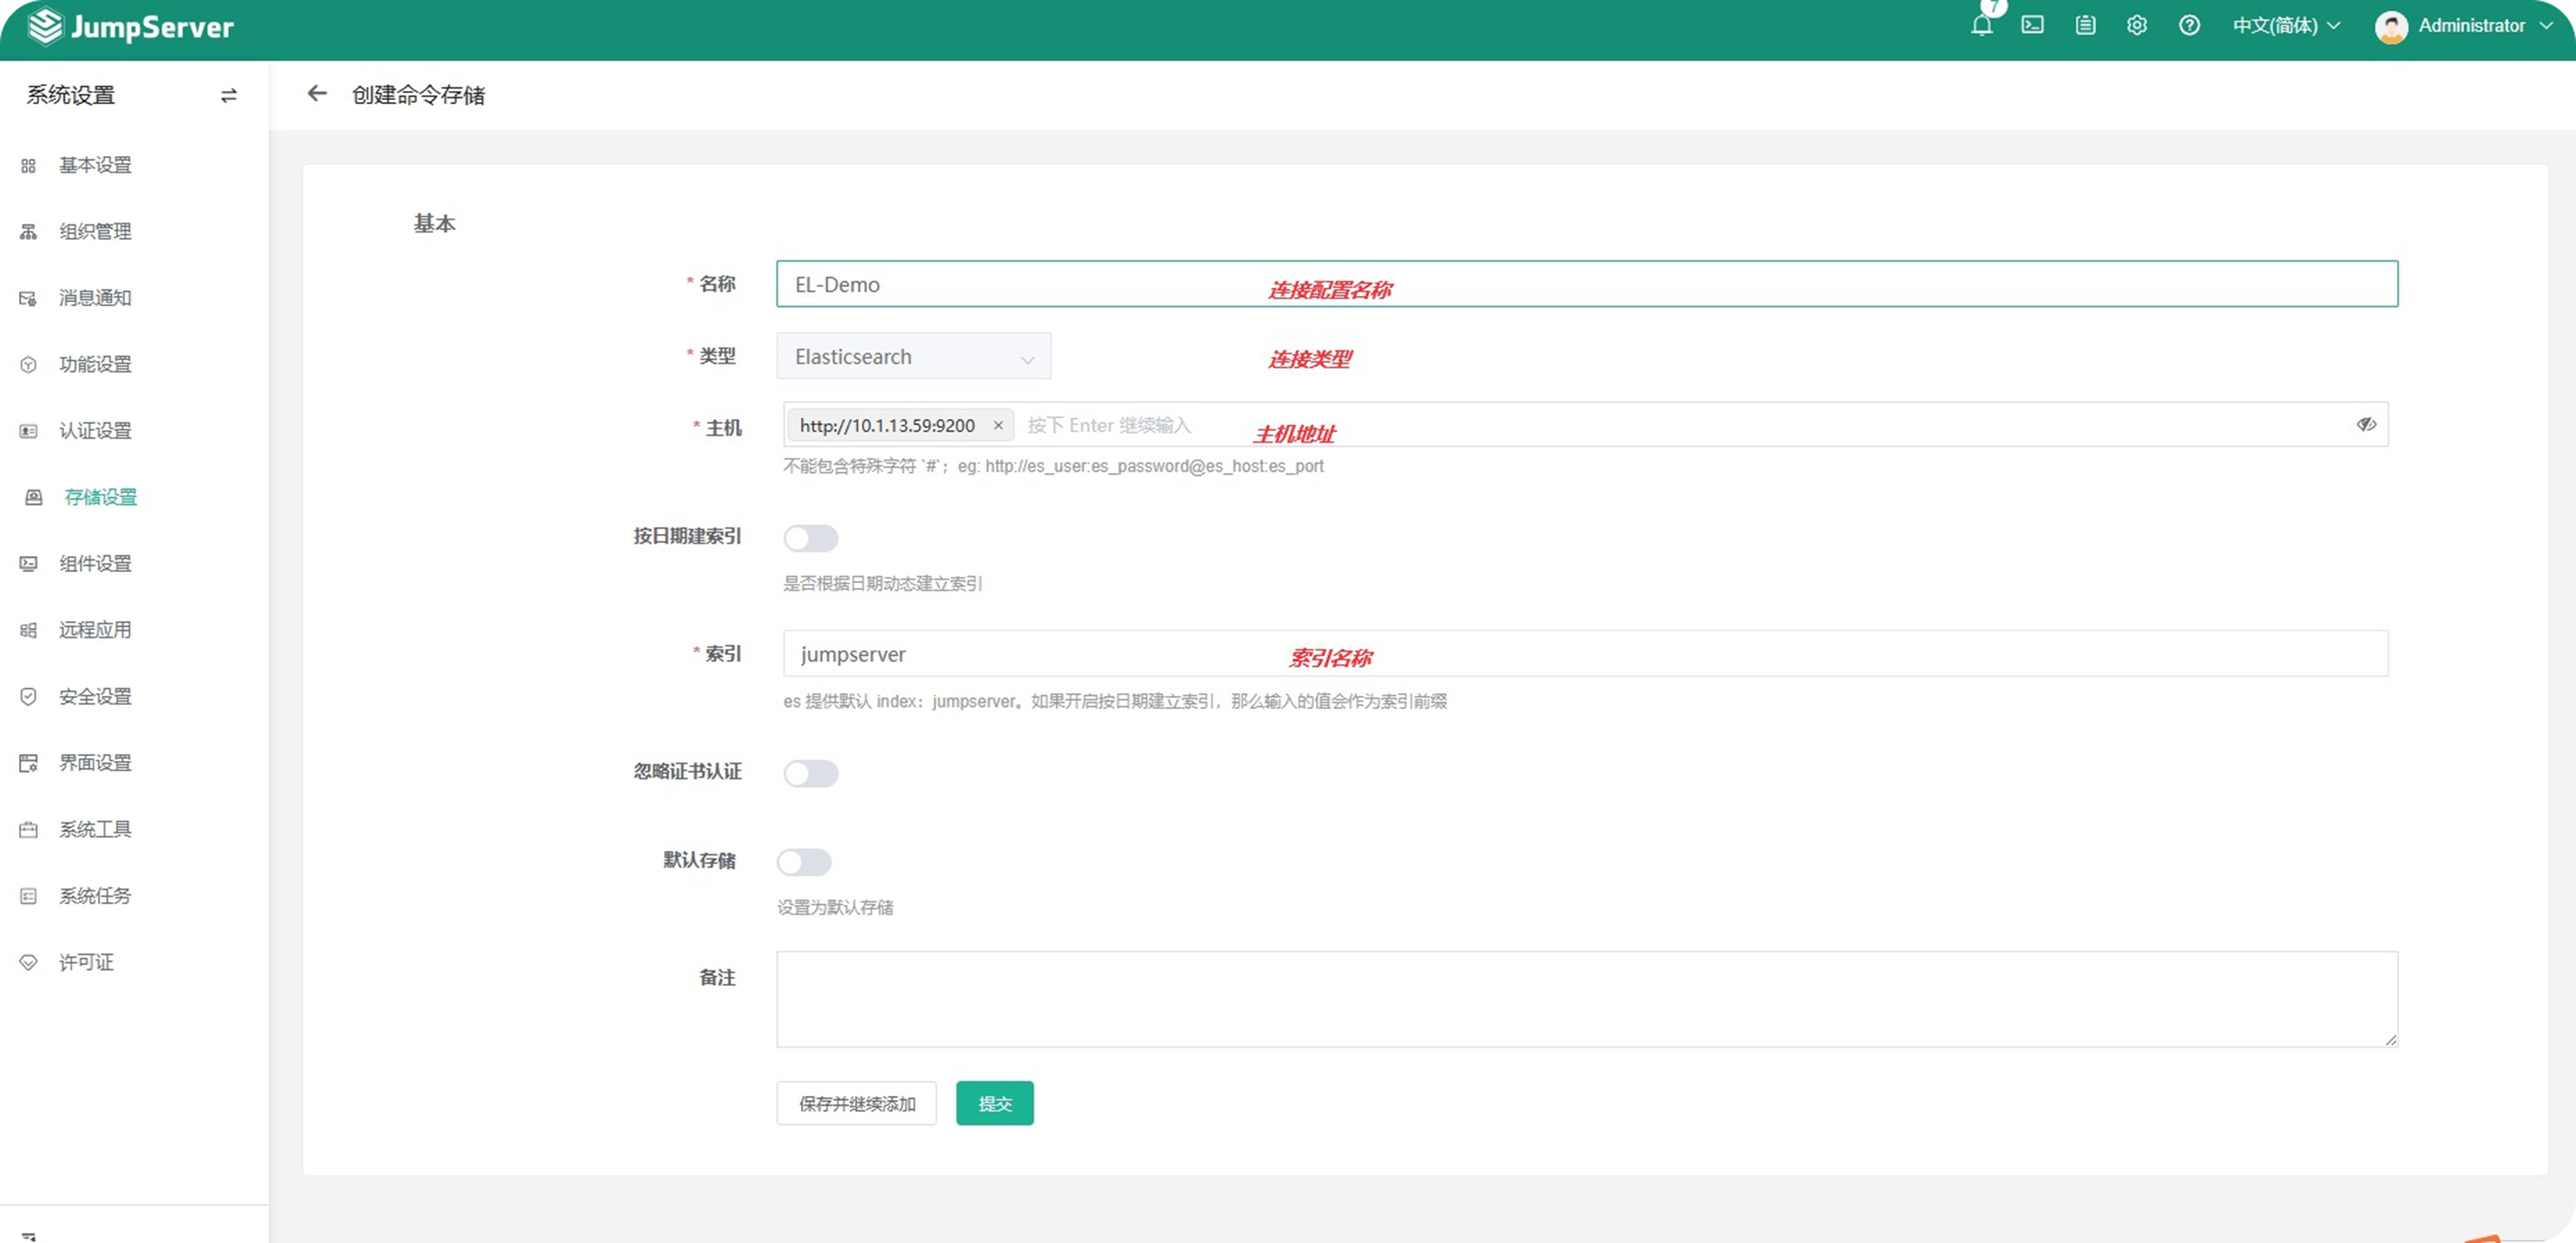
在创建命令存储页面中进行配置和管理 Elasticsearch 集群连接信息,包括名称、主机和索引等信息。
提交后返回存储设置页面,在右侧 “更多” 出选择测试功能,进行连接性测试。
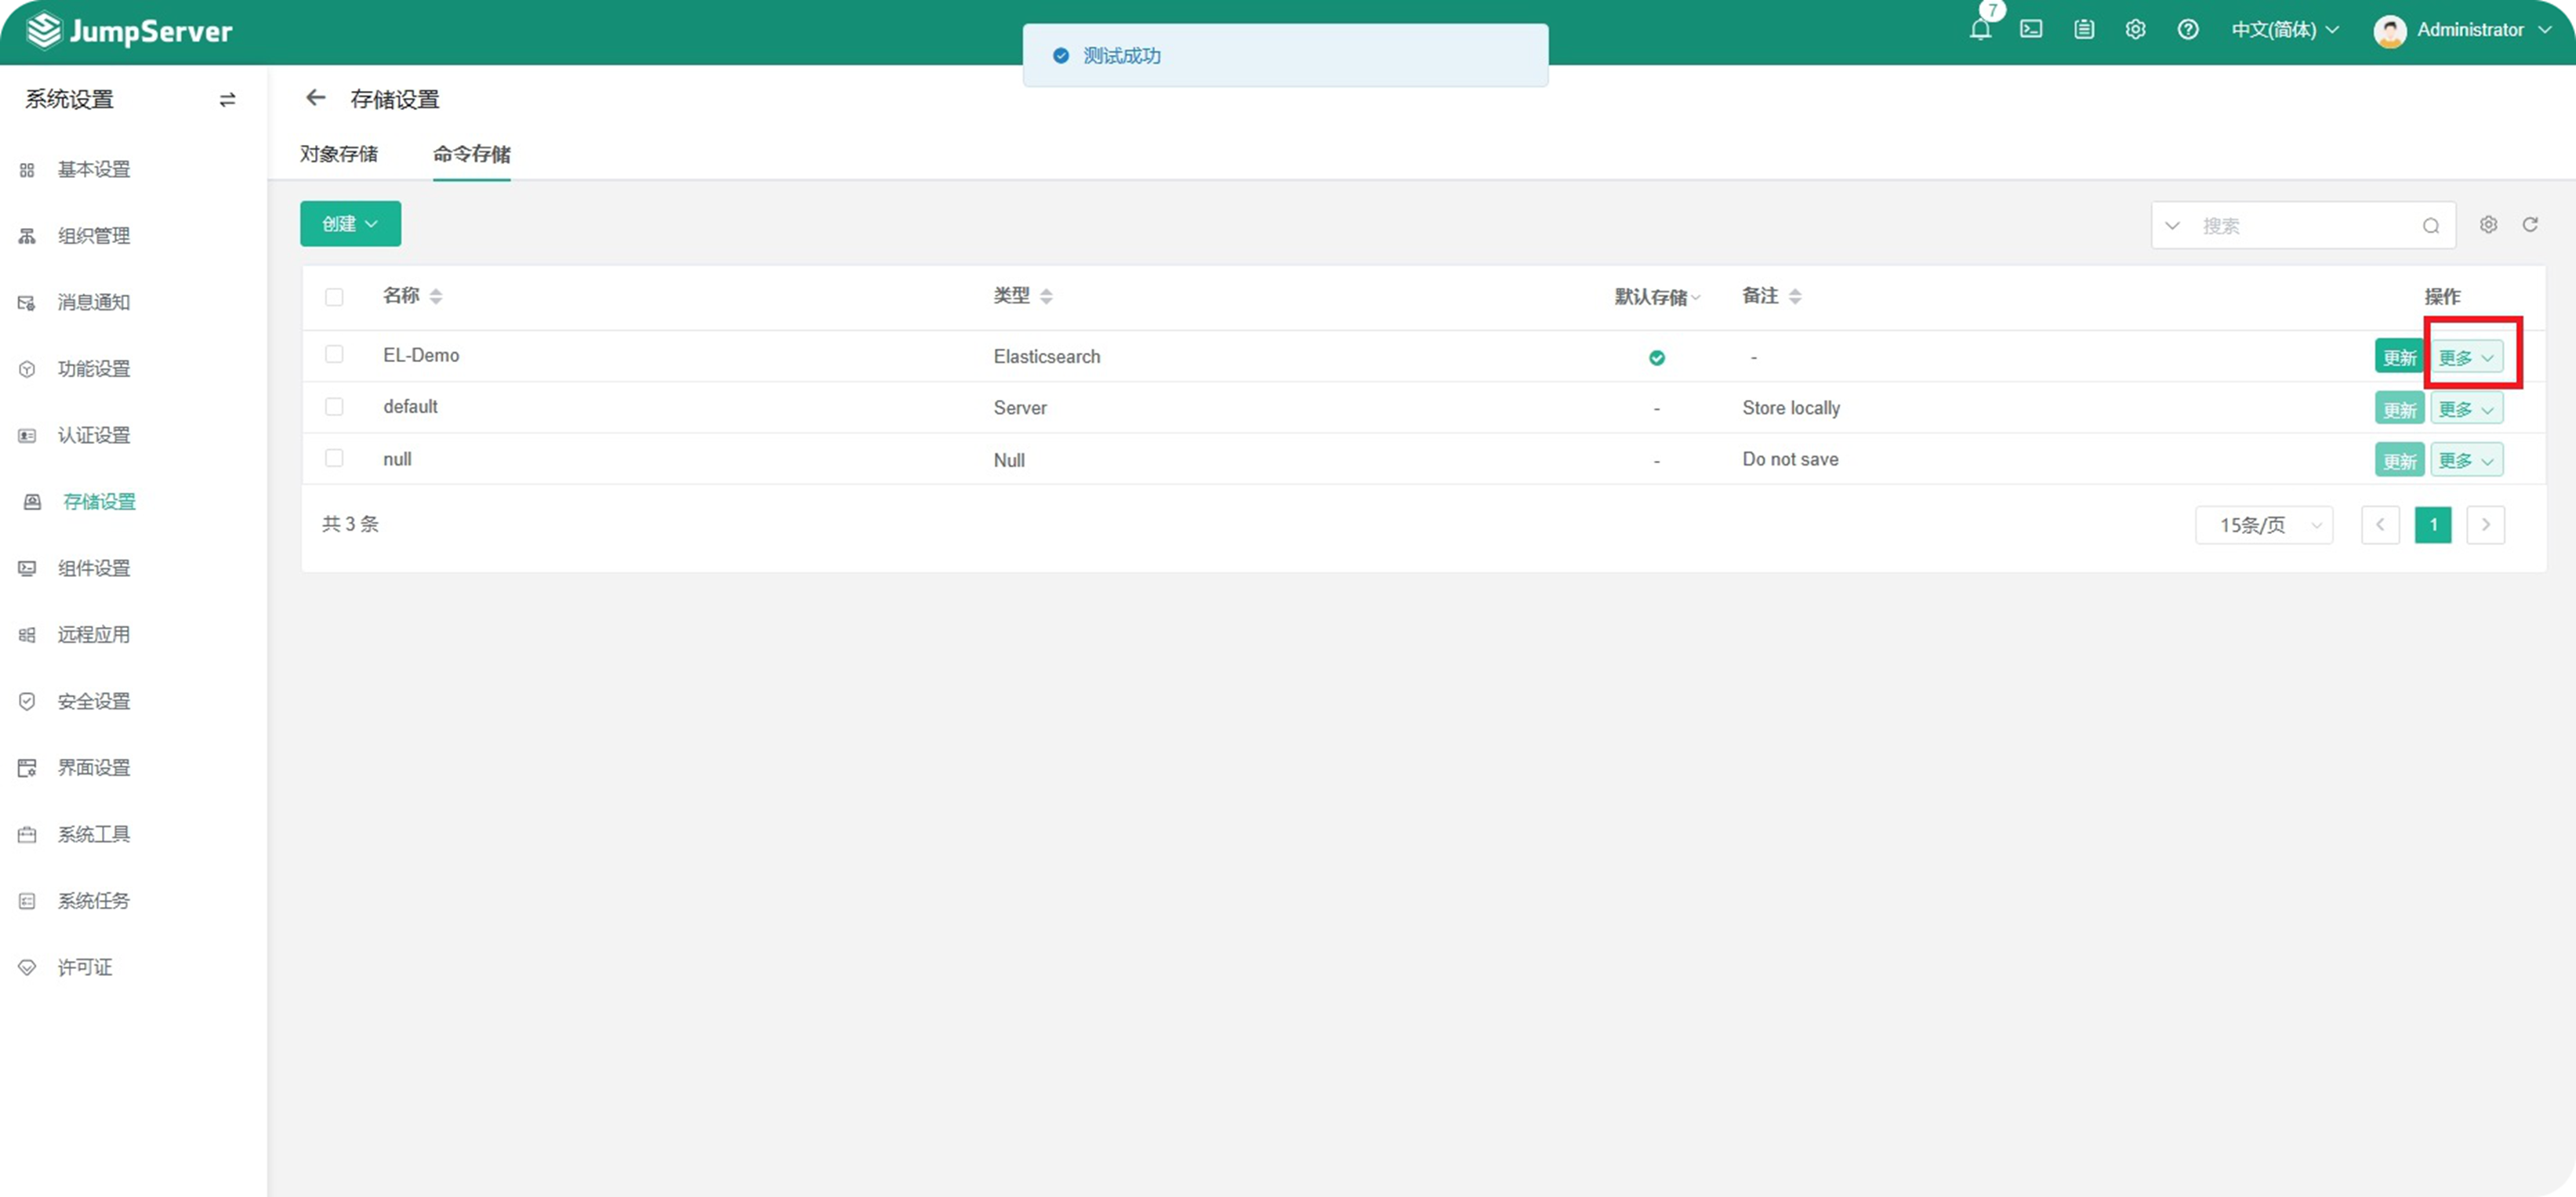
页面显示测试成功后表示 JumpServer 堡垒机与 Elasticsearch 集群通信正常。
2.3.2 JumpServer 组件使用 Elasticsearch
确认 JumpServer 堡垒机与 Elasticsearch 集群通信正常后在系统设置-组件设置-组件管理- 子模块中配置 JumpServer 堡垒机组件将命令存储至 Elasticsearch 集群环境。
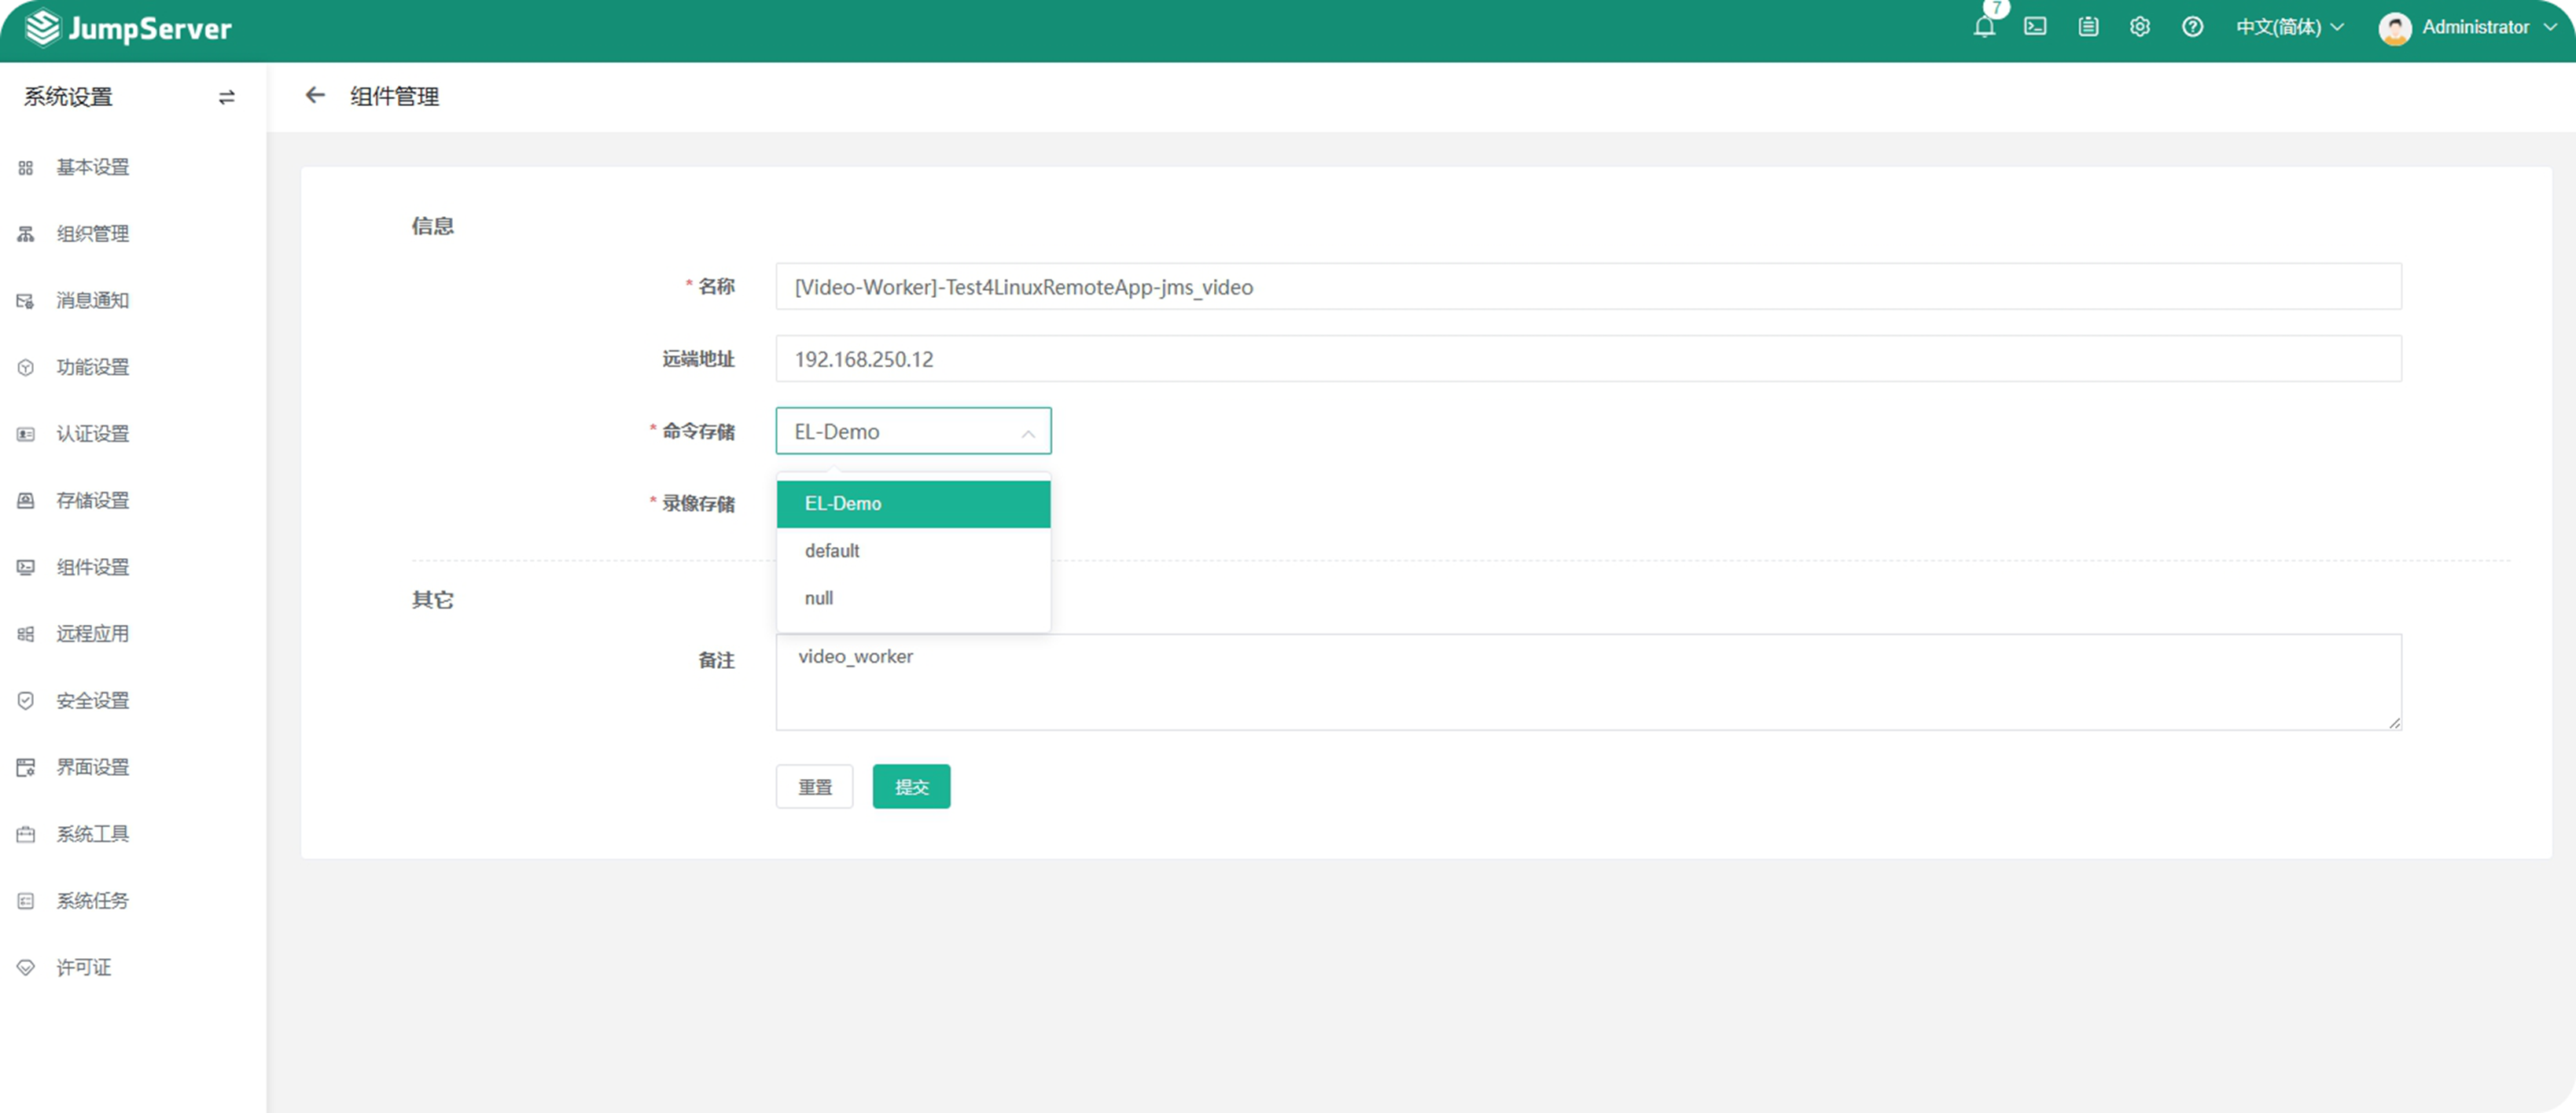
选择配置的组件,使用 “更新” 命令。
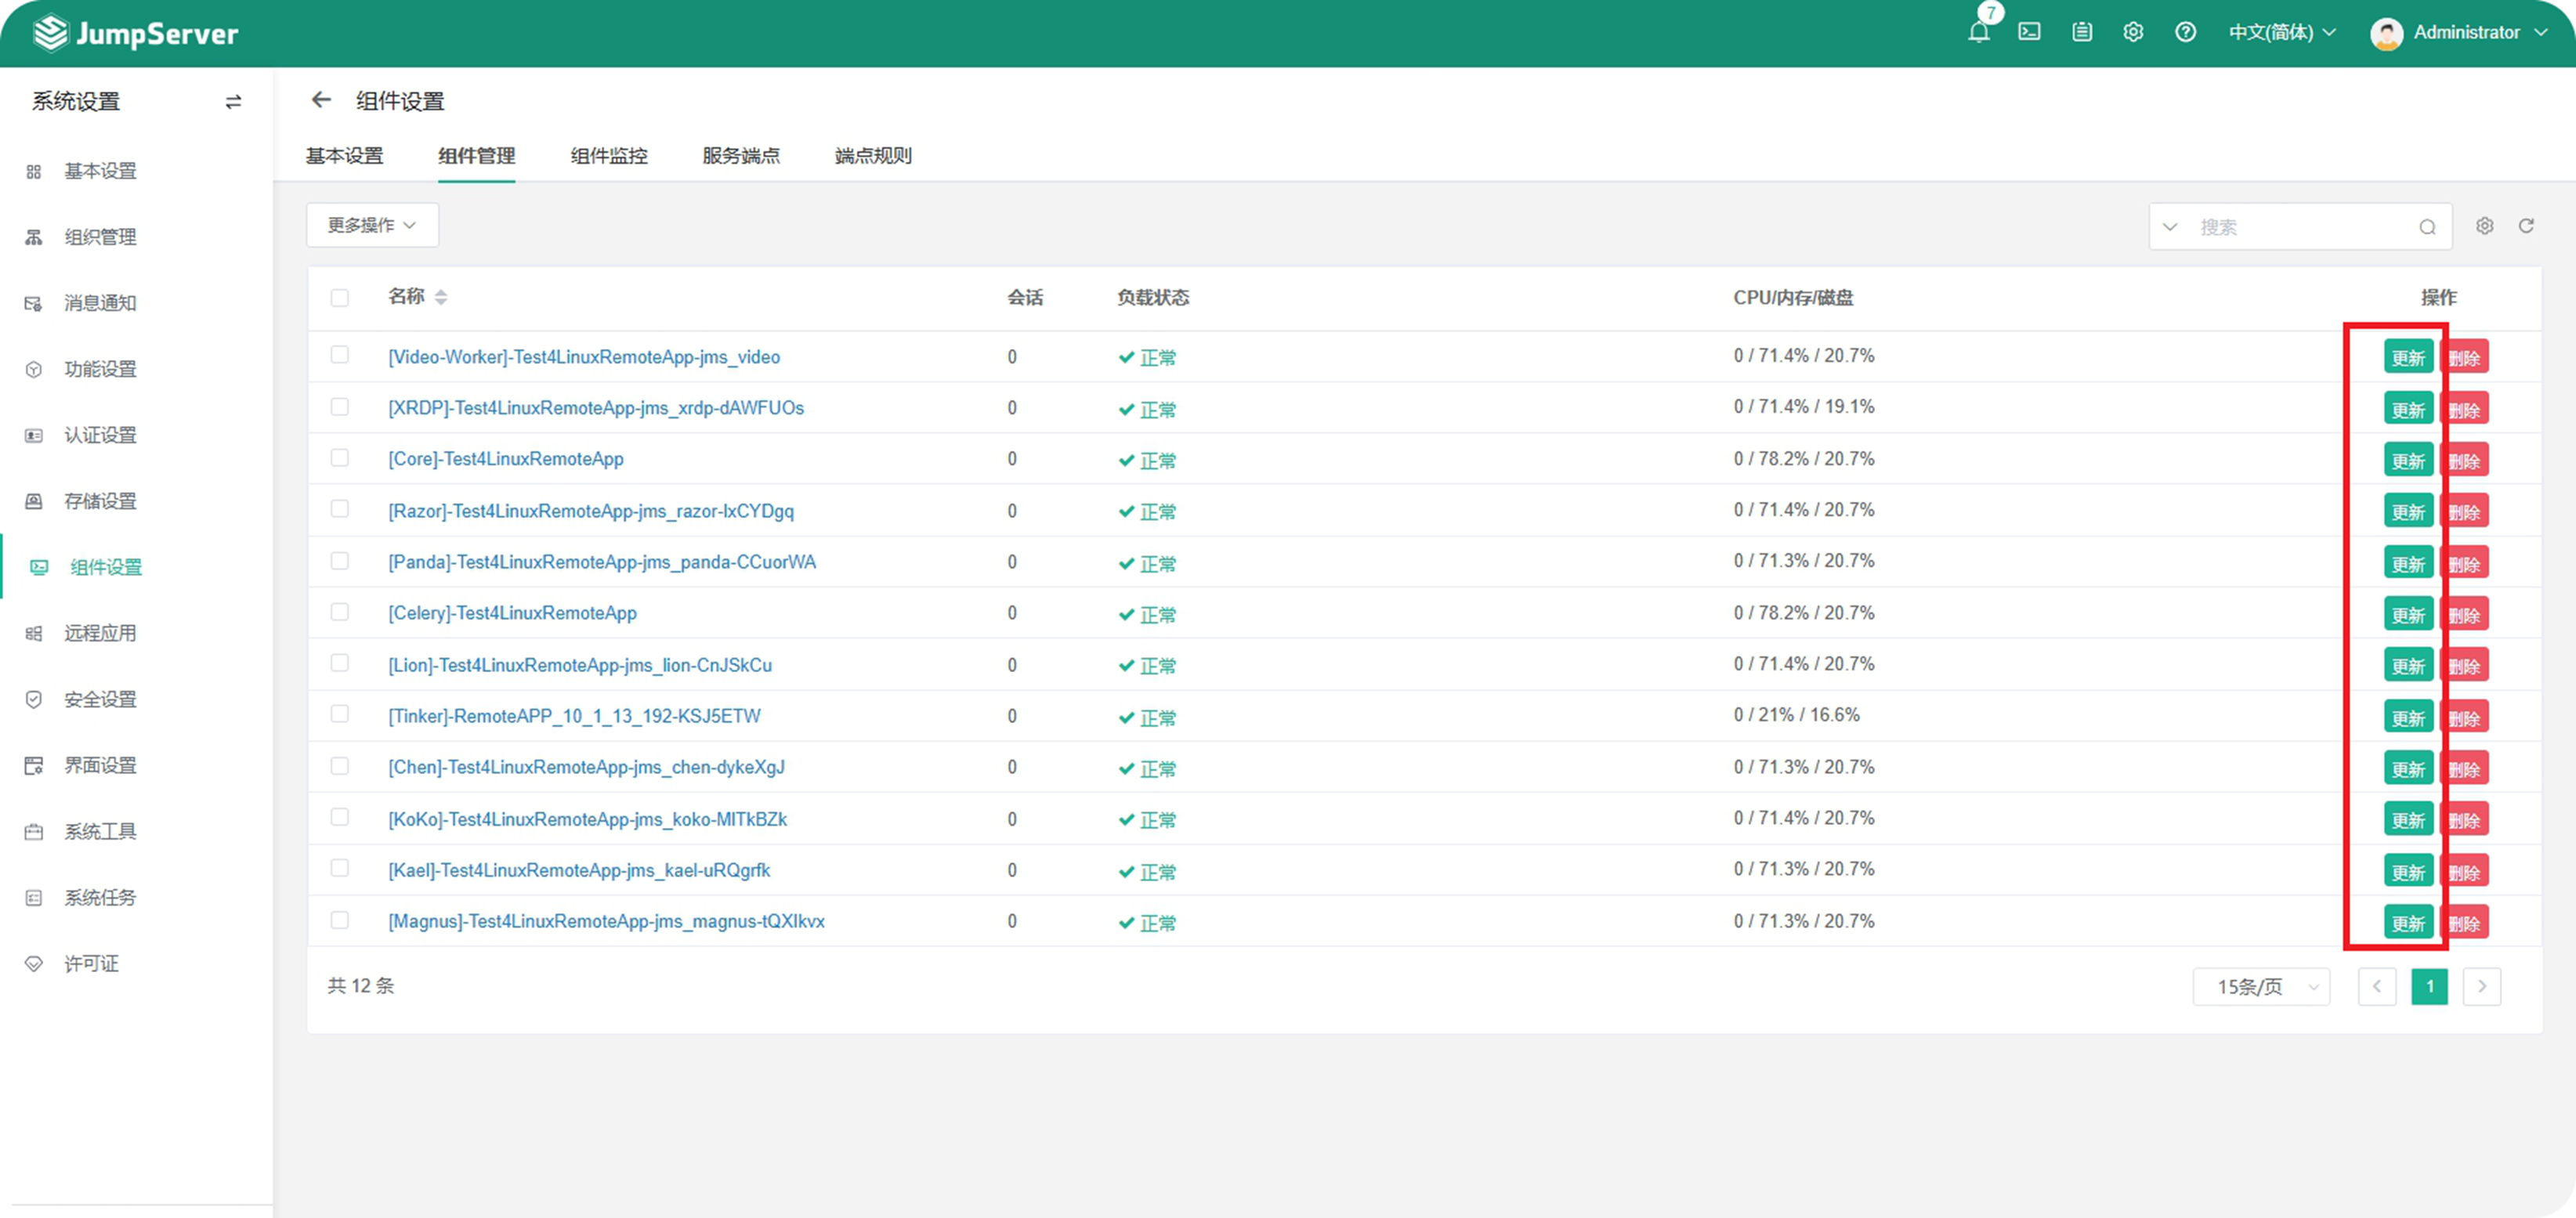 在更新页面中选择新建的 Elasticsearch 对象。
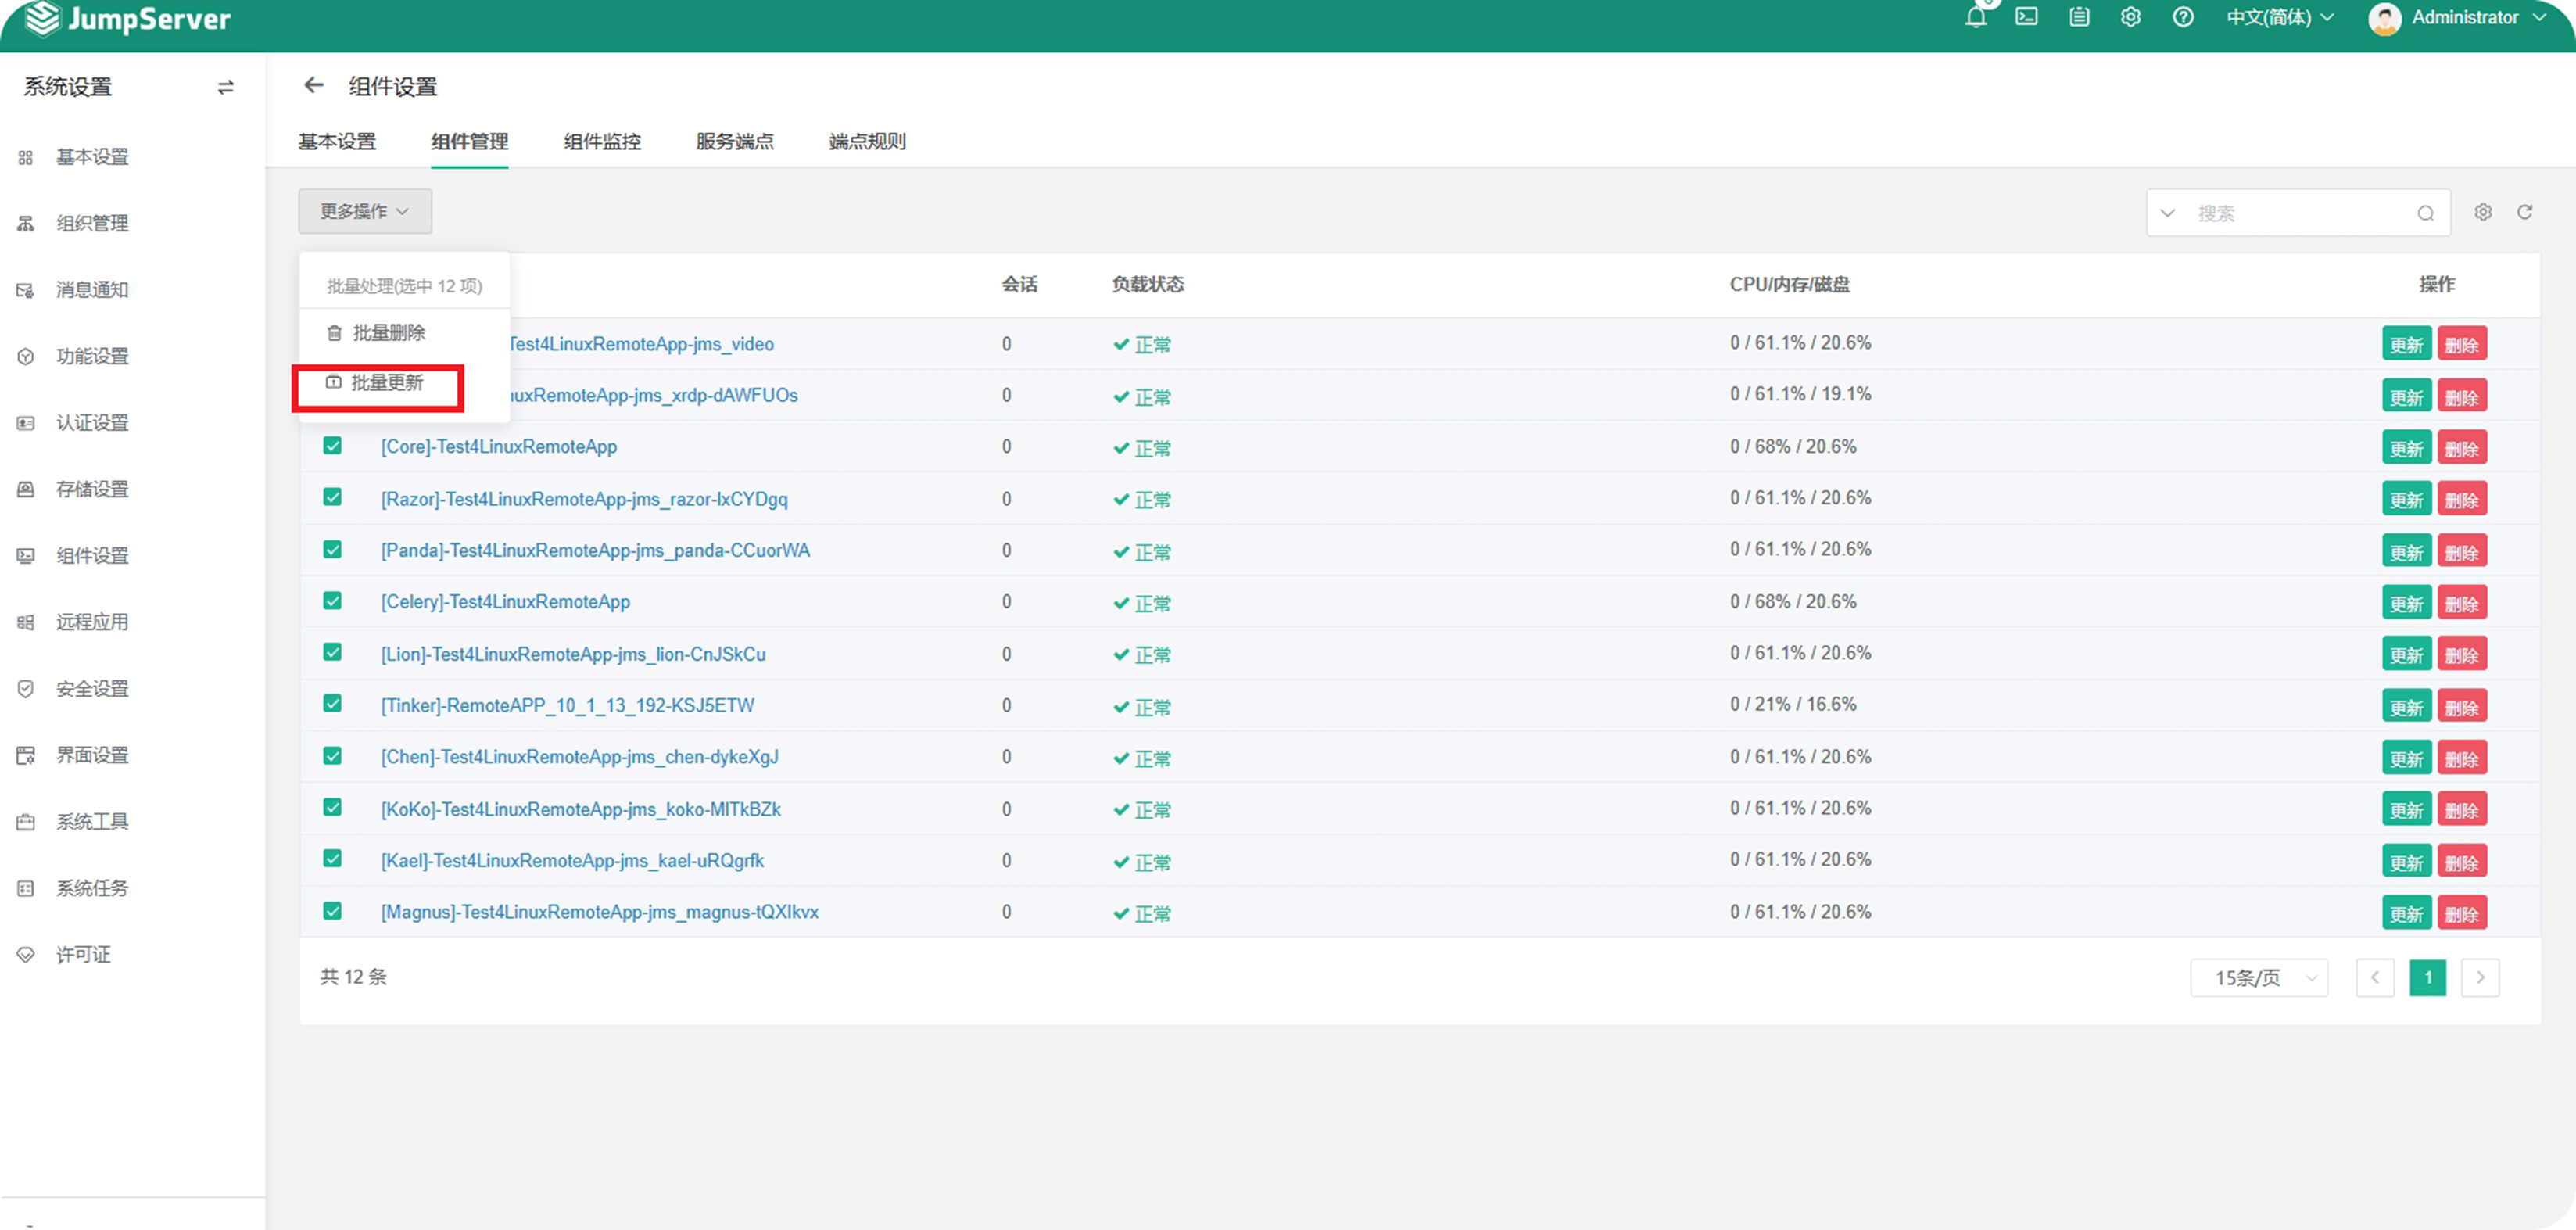
如果需要批量更新组件命令存储设置,可以选择 ”批量更新” 功能。
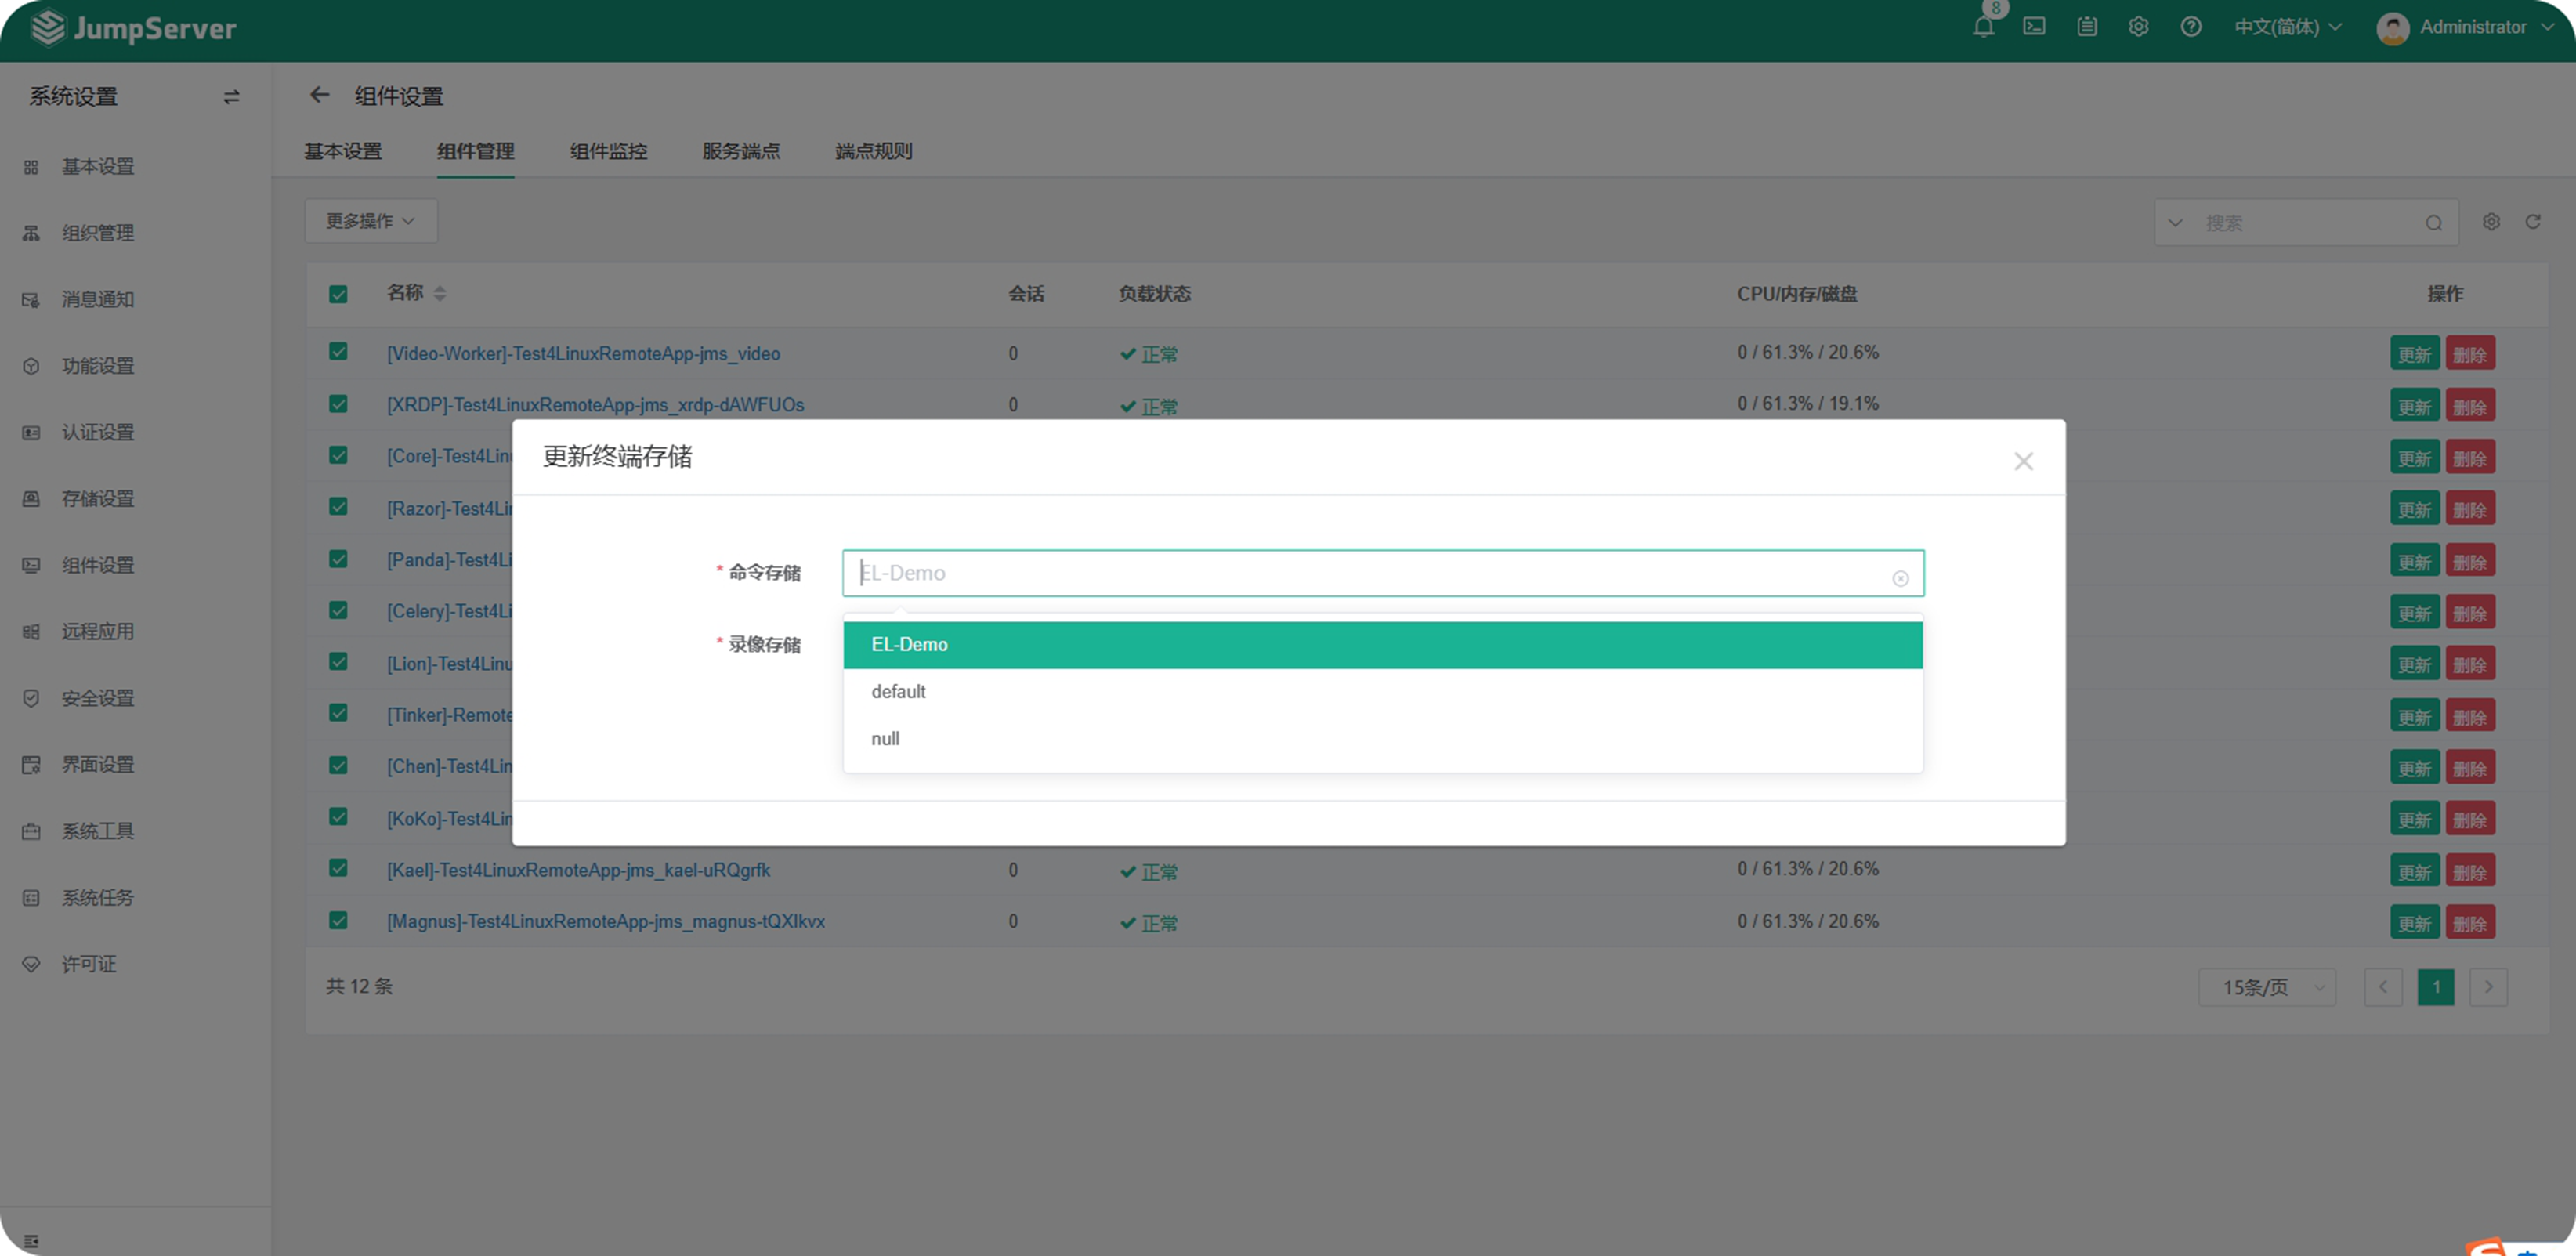
在批量更新页面中选择新建的 Elasticsearch 对象。
2.3.3 JumpServer 对接 Elasticsearch 验证
在 JumpServer 堡垒机成功对接 Elasticseach 集群环境后可以连接任意资产测试是否能正常将命令记录到 Elasticseach 集群。
登录资产,执行命令操作。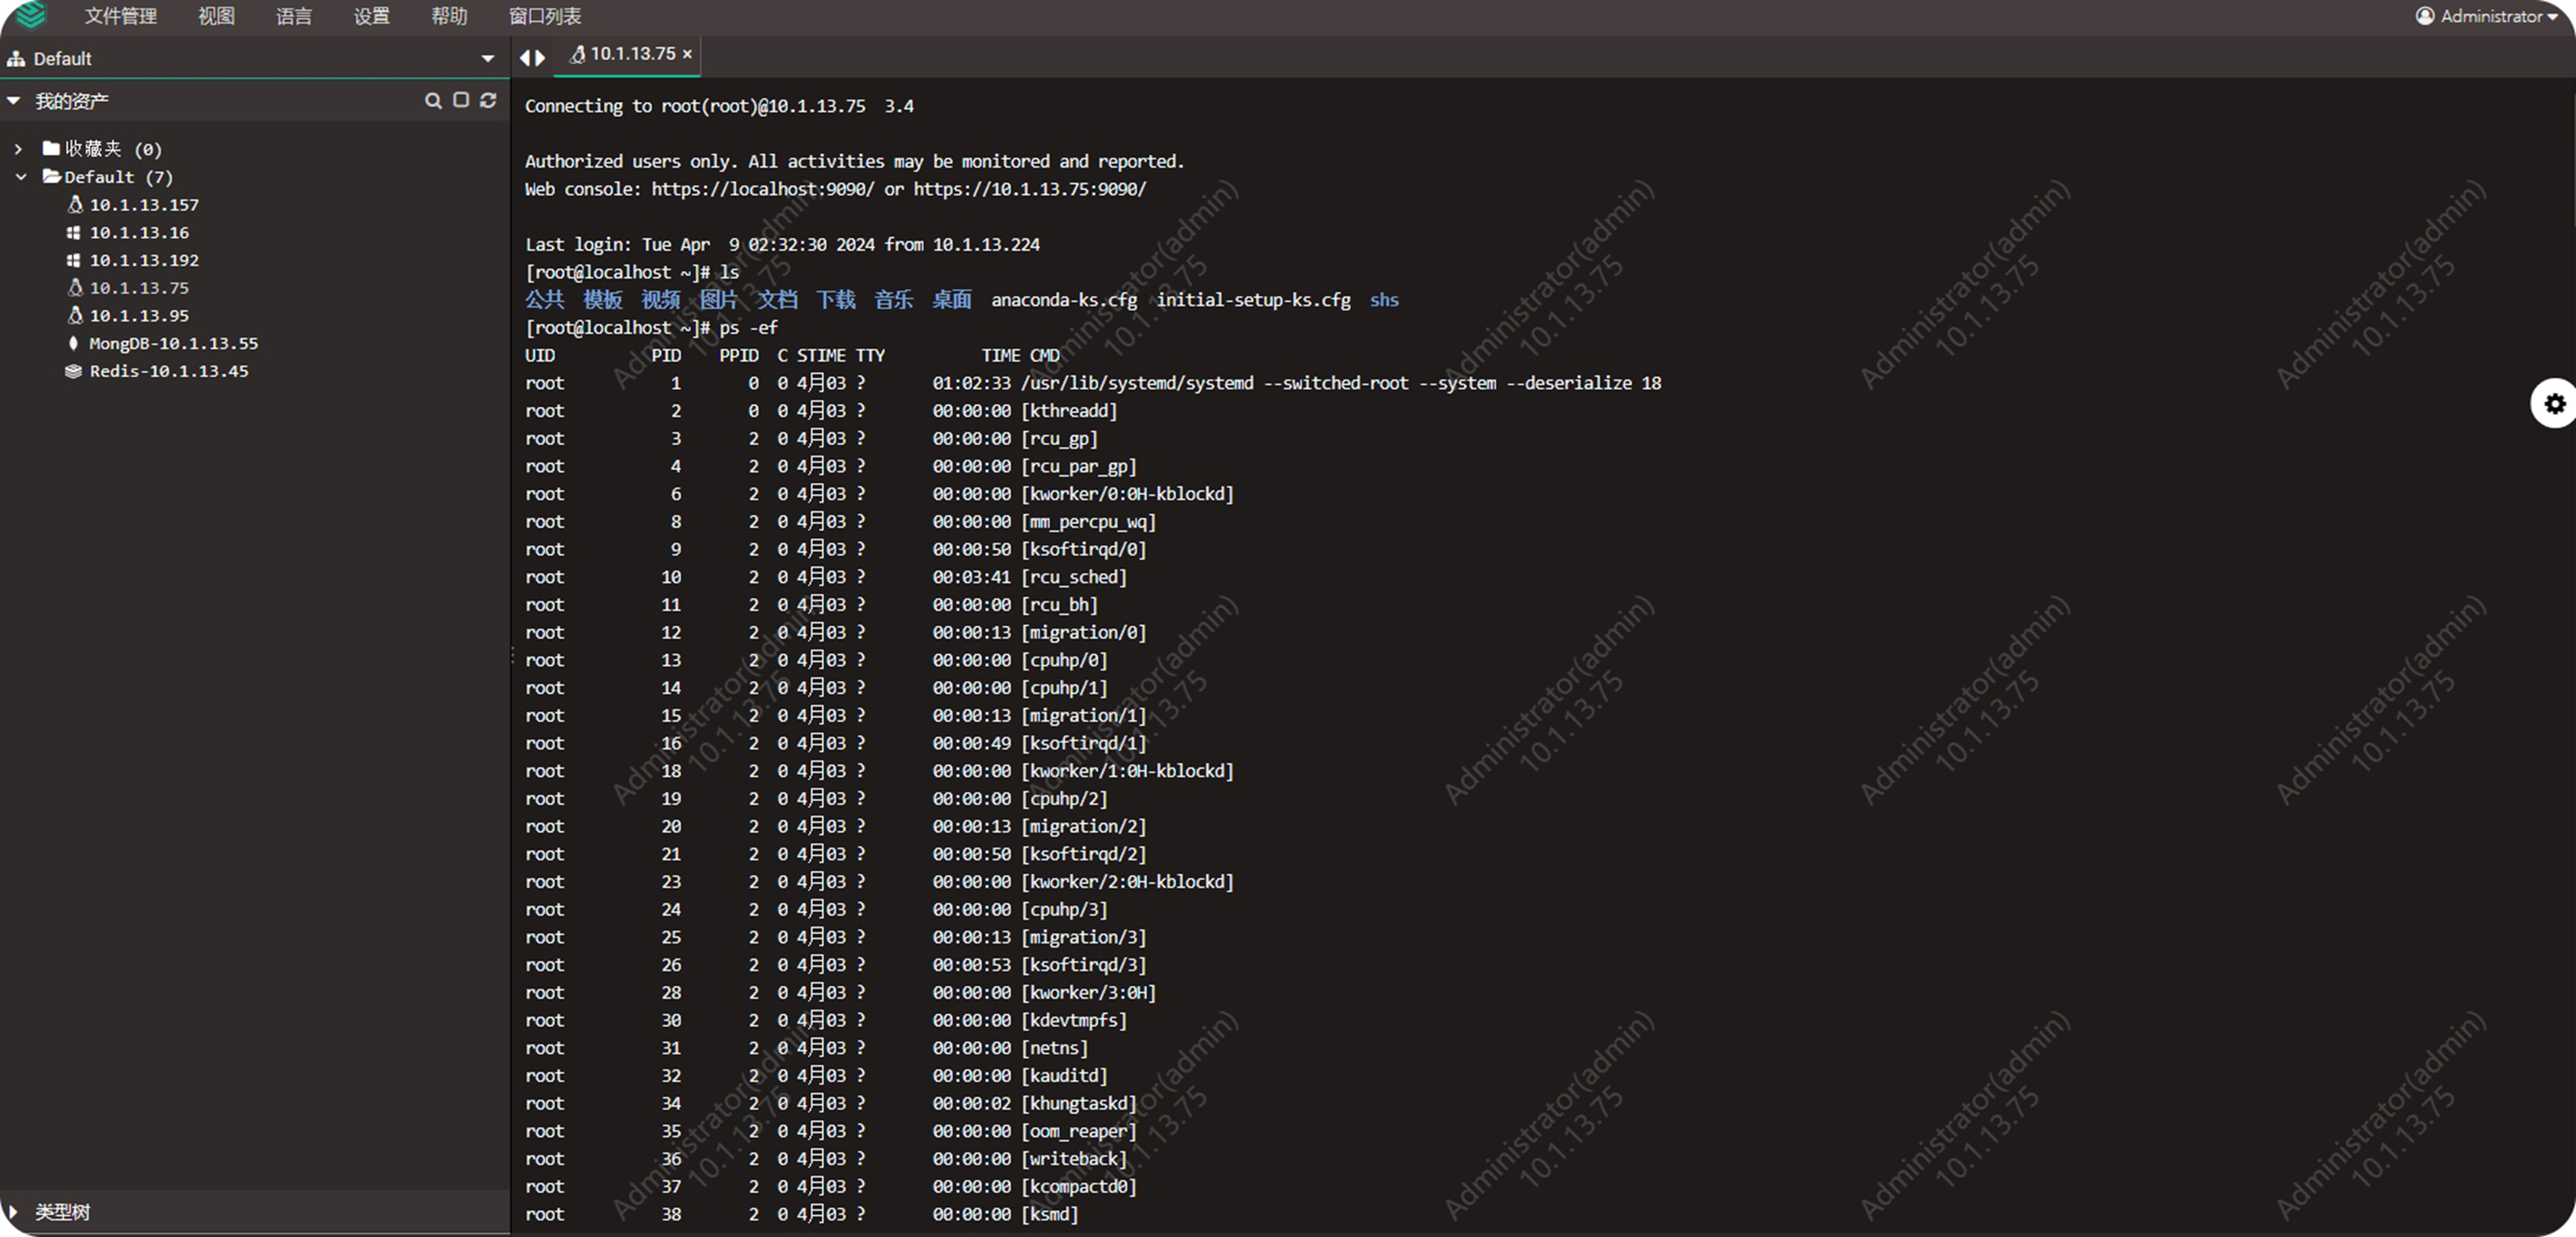
在 JumpServer 堡垒机审计台页面 -> 会话审计模块 -> 命令记录子模块中查看结果。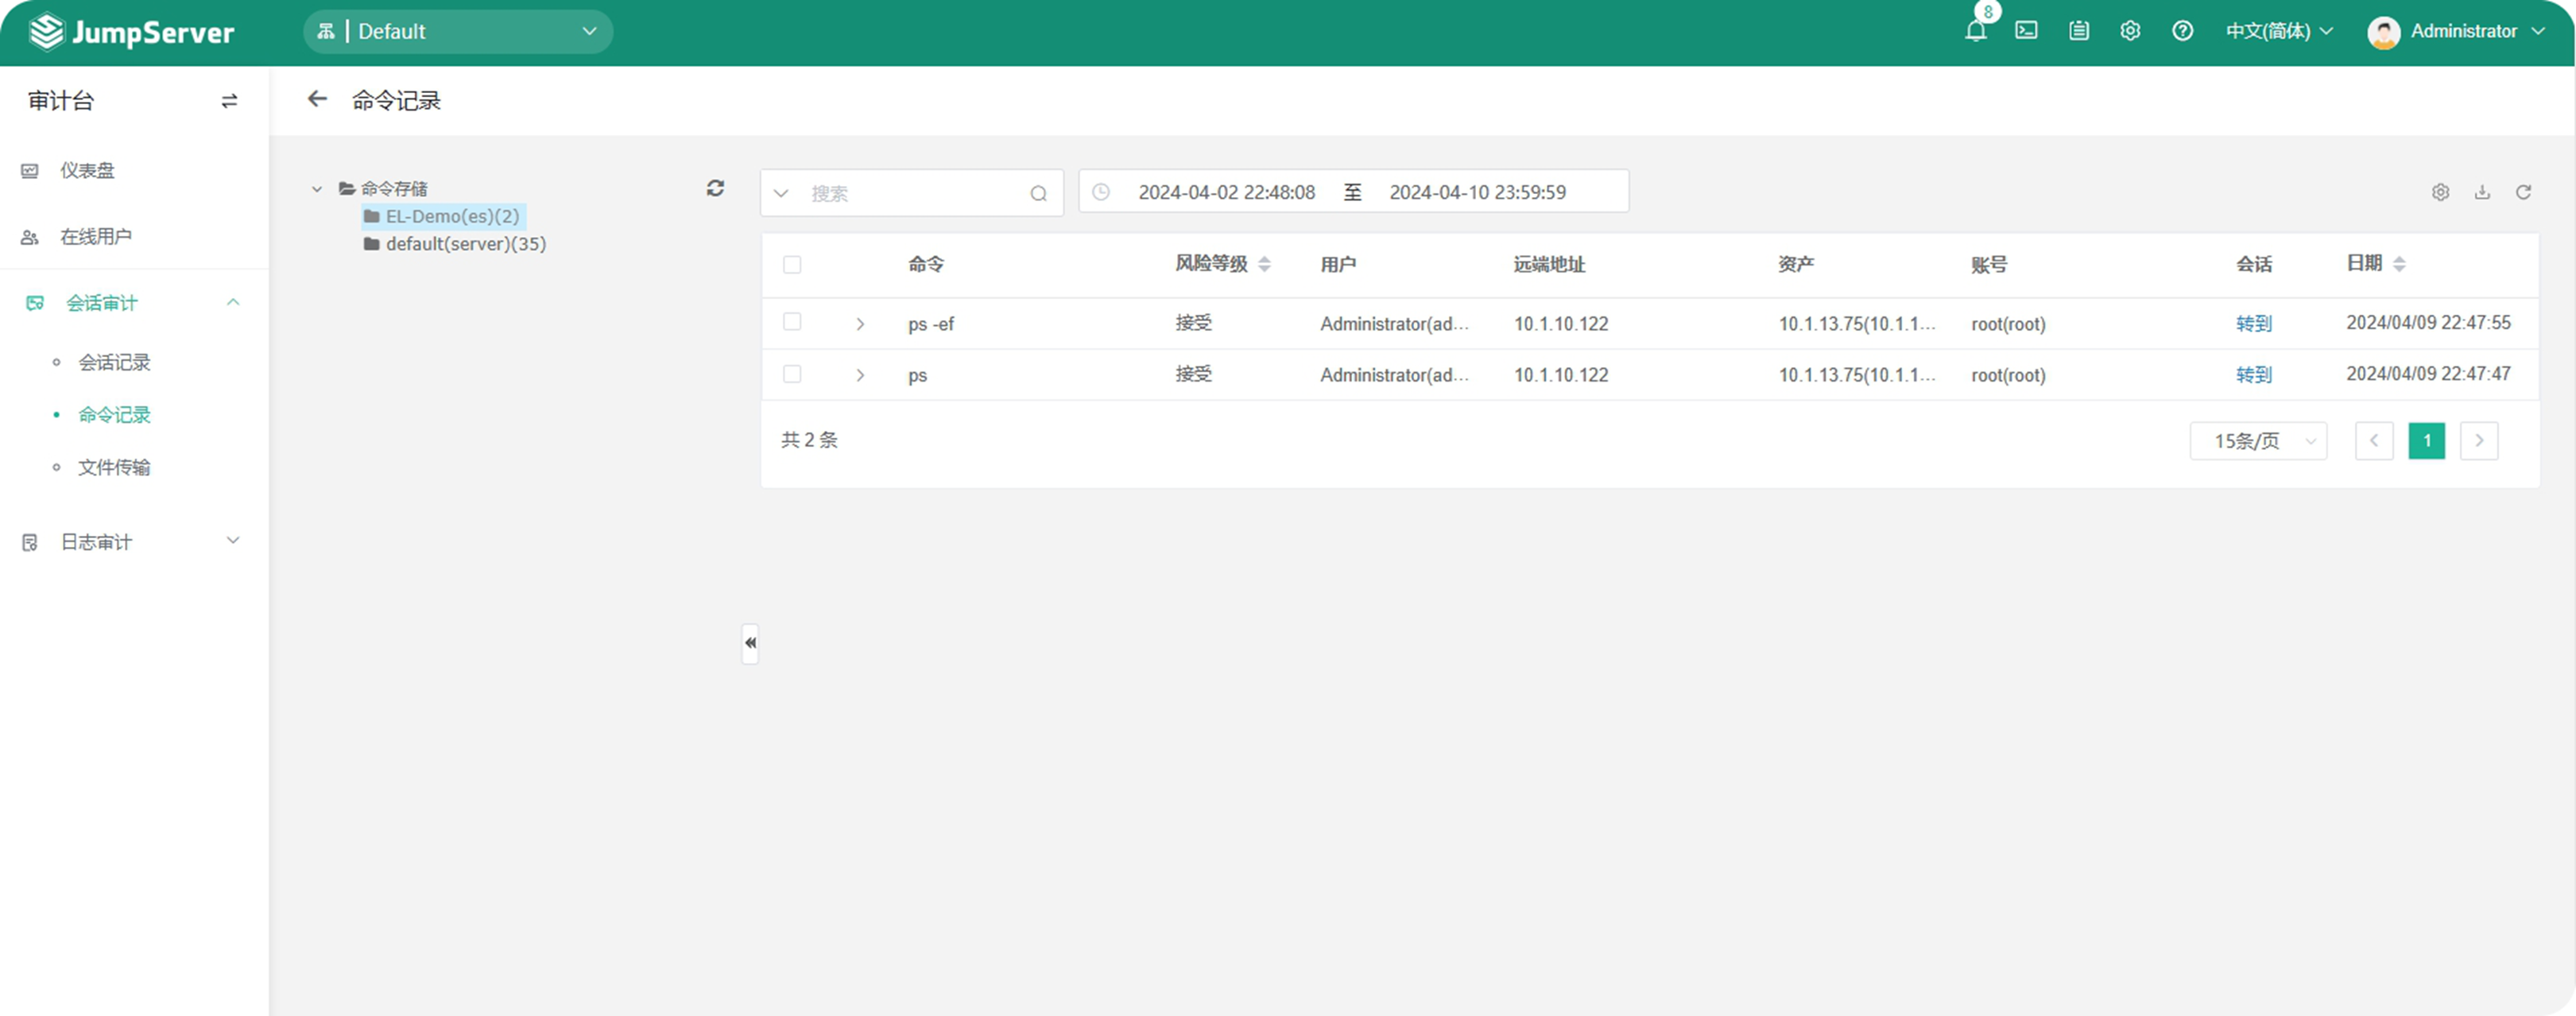
通过上述配置 JumpServer 堡垒机成功将命令记录存储至选定的 Elasticsearch 集群。